
COURSEWORK
Souparno's IOT-001 course work. Lv 2
| Souparno Baidya | AUTHOR | ACTIVE |
Souparna's LEVEL 0 report
14 / 9 / 2025
MARVEL REPORT
TASK-1
Objective: Understand the working of a 3D printer:-
- Check out the online resources.
- Understand what's an STL file, and then learn to slice it.
- Learn about bed temperature, and other printer settings.
- Finally get an STL file from the internet, and slice it and put it for print.
Outcomes & Learnings:
I.PLA (Poly-Lactic Acid) is the most used material for 3D printing, it is derived from renewable feedstock like corn and sugarcane also it breaks down thousands of times faster than other petroleum-based plastics.
II.Bed temperature: PLA/PLA+ can be printed on an unheated bed, for best results we recommend and a bed temp of between 50°C - 60°C.
III.PLA prints best when rapidly cooled with the aid of your extruder's fan. This will ensure a clean, crisp layers with neat details. For the best surface resolution possible, set the extruder fan speed to 100%.
IV.Printing Speed: printing at 55mm/s or slower yields great results. It represents for us the sweet spot between print speed and achieving great surface resolution.
V.Post Printing Procedures:
Joining 3D Printed Parts
Use cyanoacrylate glue (superglue) or two-stage epoxies for strong and reliable bonding of PLA parts.
Ensure surfaces are clean and dry before applying adhesive for best results.
Painting
Most 3D printed parts (except Nylon and PETG) can be easily painted.
For improved adhesion and finish, apply a primer coat before painting.
Sanding PLA Parts
Achieve a smooth surface finish by sanding with progressively finer grades of sandpaper.
Sand gently and slowly to avoid breaking parts or melting due to friction.
Wet sanding can help reduce heat buildup and produce a better finish.
I made a Batman keychain for this task using the 3-D printer Ender in Marvel

TASK-2 : API
Objective: Learn what an API is and how it works. Using any API of your choice, build a user interface (web app, mobile app, etc.) to make calls and display information.
An API (Application Programming Interface) is a set of rules that lets different software applications talk to each other. It explains how one program can ask another for information or services without needing to know the inner details of how it works.
For example, when you log in to a website using your Google or Facebook account, the site uses their API to verify your details instead of creating its own login system. The request is sent, processed, and the data is shared back.
APIs make things faster, reusable, flexible, secure, and easy to connect with other services.
The link of the API task(API website) I did is as under:
Nasa provides various api keys such as APOD, the one I used. Other examples are DONKI(space weather database), TECHTRASFER, etc.
For the code use this link : Click here
TASK-3 : Working with Github
learned about GitHub Actions, Issues, and Pull Requests while working on this task. The steps I followed were:
- Cloned the forked repository to my computer
- Created a new branch to work on without affecting the main branch
- Fixed the error and made the required changes
- Committed the updates to the repository
- Submitted a pull request to merge the changes


Task 4 : Command Lines on Ubuntu
Tasks I Performed on Ubuntu
- Created a folder named test
- Changed the directory into the test folder
- Created a blank file without using any text editor
- Created 2600 folders named M0001 to M2600
- Listed the files inside the folder
- Concatenated two text files into one output
| Task | Command |
|---|---|
Create a folder named testsb | mkdir testsb |
Change directory into testsb | cd testsb |
| Create a blank file | touch blank.txt |
| List files in the folder | ls |
Create 2600 folders (M0001–M2600) | mkdir $(seq -f "m%04g"1 2600) |
| Concatenate two text files | cat blank.txt blank2.txt |
 |
Task 5 : Kaggle Contest
Kaggle is a leading platform for data science and machine learning enthusiasts, providing tools, datasets, and competitions to develop and showcase skills.
Thus, arose an opportunity for me to participate in the Titanic ML competition- the best, first challenge for a beginner like me to explore and get accustomed to this platform. It was required of us to use machine learning to create a model that predicted which passengers survived the Titanic shipwreck.
My Kaggle notebook:


Task 6 : Working with Pandas and Matplotlib
I learned how to plot a line graph, bar graph, and scatter plot along with a dataset of my choice, using Pandas and Matplotlib. By applying the code provided, I was able to generate the respective visualizations, as shown in the images below:
.png?raw=true)
.png?raw=true)
.png?raw=true)
And the codes are as follows:
Task 7 : Portfolio Webpage
Using HTML and CSS, I created my portfolio page. I used Pinterest to get my background. The portfolio page contains information about my eduction, skills and other things. I hosted it in github and using that got a link for the website.
For visiting the website use this link : Click here


Task 8 : Writing Resource Article using Markdown
My technical article is about AI and Immunotherapy Advances in Cancer Research.The convergence of these fields holds particular promise for addressing some of cancer's most challenging aspects, including treatment resistance, immune evasion, and the heterogeneity of tumor responses. As these technologies mature and become more widely accessible, they have the potential to significantly improve survival rates and quality of life for cancer patients worldwide.

Link to my resource article Click here
Task 9 : Tinkercad
Objective: The objective of this task was to create a tinkercad account & to make a simple circuit to estimate the distance between the ultrasonic sensor and the object.
Tinkercad is a free, web-based application that allows users to create 3D designs and models, suitable for 3D printing. It is very useful for simulating circuits due to its User-Friendly Interface, Code Integration etc. In this task i created a tinkercad account and made a simple circuit using ultrasonic sensor to estimate the distance between an obstacle and the sensor.
Components Required
Arduino Uno
Jumper Wires
Ultrasonic Distance Sensor
Micro Servo

Working Principle of Ultrasonic Sensor
- The transmitter emits a burst of ultrasonic sound waves (beyond human hearing range).
- These waves travel through the air until they hit an object.
- Upon contact, the waves bounce back (reflect) toward the sensor.
- The receiver picks up the reflected waves and measures the time taken for the round trip.
TASK 10: Speed Control of DC Motor
Objective: Understand the control DC motors using the L298N motor driver and the Arduino board. Using an UNO and H-Bridge L298N motor driver, control the speed of a 5V motor.
Introduction
In this task, I explored how to control a DC motor using an Arduino and an L298N motor driver.
Through this project, I gained hands-on experience in:
- Driving a 5V DC motor
- Regulating its speed using PWM (Pulse Width Modulation)
- Understanding the interaction between Arduino signals and the motor driver
This experiment provided me with a solid foundation in motor control techniques and the practical use of PWM in embedded systems.
Components:
- Arduino UNO
- L298N Motor Driver
- DC Motor (5V)
- Power Supply (5V)
- Jumper Wires
- Breadboard
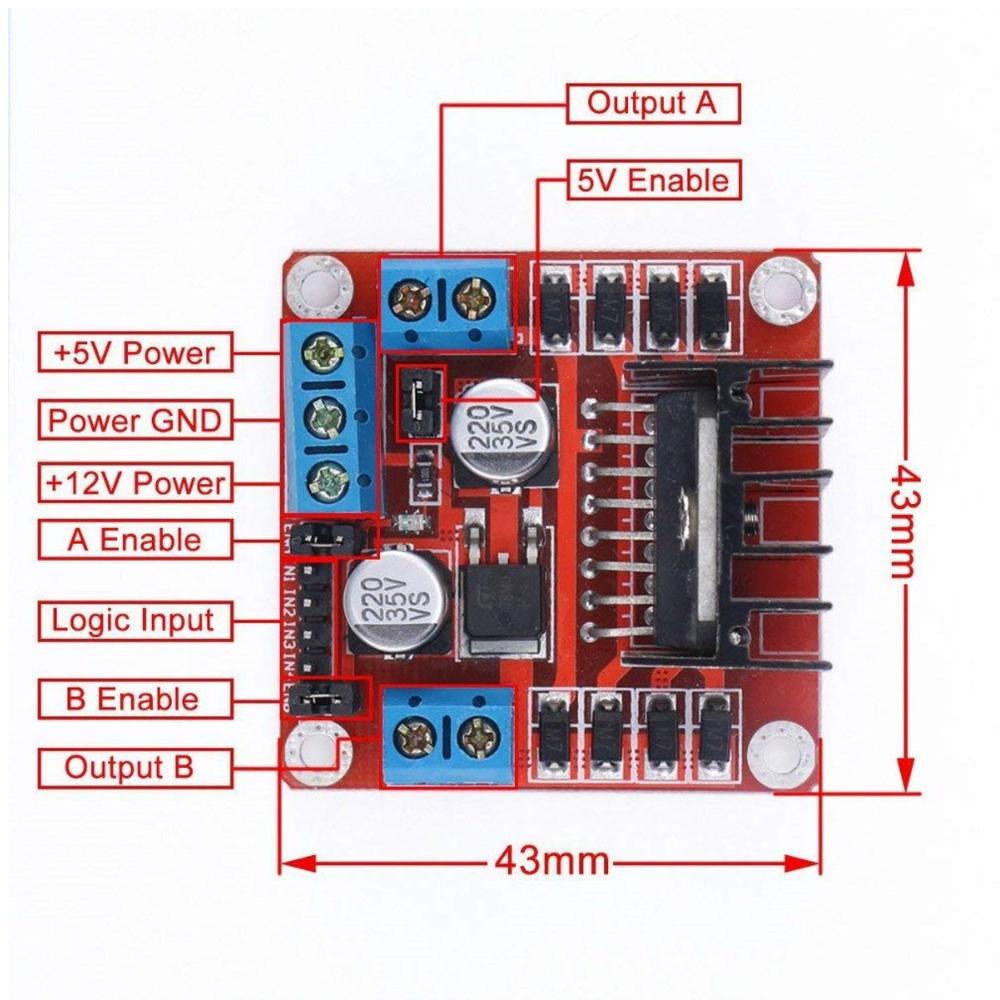
Working principle :
The Arduino sends control signals to the L298N motor driver to manage the DC motor.
The L298N contains an H-Bridge circuit, which allows current to flow in either direction through the motor.
By changing the logic levels on the IN1 and IN2 pins, the motor’s rotation direction can be controlled (clockwise or counterclockwise).
The ENA pin of the L298N receives a Pulse Width Modulation (PWM) signal from the Arduino.
The PWM signal’s duty cycle determines the effective voltage supplied to the motor, thus controlling its speed:
-0% duty cycle → Motor stops.
-50% duty cycle → Motor runs at half speed.
-100% duty cycle → Motor runs at full speed.
A potentiometer connected to the Arduino provides an adjustable input that varies the PWM signal, allowing smooth and continuous control of the motor’s speed.
For the tasks 11-19 : Click here