
COURSEWORK
HIREMATH's D-P-001 course work. Lv 2
| HIREMATH SUGURESH | AUTHOR | ACTIVE |
20 / 7 / 2024
Task 8: Writing Resource Article using Markdown
Markdown is a lightweight markup language that uses plain text formatting syntax to stylize and structure documents, widely used for creating content for the web, including documents, blog posts, and readme files.
Link to the article
Task 12: Soldering Prerequisites
I Learnt about the soldering equipment present in our lab, the solder, the soldering iron, soldering wick, flux, etc. I Learnt to use them and perform basic soldering on a perf board, i.e a LED circuit, in the presence of a coordinator.
Task 11: LED Toggle Using ESP-32
Toggling an LED using an ESP32 is a simple yet effective way to get started with this powerful microcontroller. This guide will walk you through the steps to set up and program the ESP32 to control an LED.
Components Needed
- ESP32 development board
- LED
- Resistor (220 ohms)
- Breadboard
- USB cable for programming the ESP32
Connections
- Connect the anode (long leg) of the LED to a GPIO pin on the ESP32 (e.g., GPIO 2).
- Connect the cathode (short leg) of the LED to one end of the resistor.
- Connect the other end of the resistor to the GND pin on the ESP32.
Setting Up the Development Environment
Step 1: Install Arduino IDE
Download and install the Arduino IDE from arduino.cc.
Step 2: Install the ESP32 Board Package
- Open the Arduino IDE.
- Go to
File->Preferences. - In the "Additional Board Manager URLs" field, add the following URL:
https://dl.espressif.com/dl/package_esp32_index.json. - Go to
Tools->Board->Boards Manager. - Search for
esp32and install theesp32package by Espressif Systems.
Step 3: Select the ESP32 Board
- Go to
Tools->Board. - Select
ESP32 Dev Moduleor the specific ESP32 board you are using.
Writing the Code
Open the Arduino IDE and create a new sketch. Copy and paste the following code:
// Define the LED pin
const int ledPin = 2;

void setup() {
  // Initialize the LED pin as an output
  pinMode(ledPin, OUTPUT);
}

void loop() {
  // Turn the LED on (HIGH is the voltage level)
  digitalWrite(ledPin, HIGH);
  // Wait for a second
  delay(1000);
  // Turn the LED off by making the voltage LOW
  digitalWrite(ledPin, LOW);
  // Wait for a second
  delay(1000);
}
Task 10: Speed Control of DC Motor
Methods of Speed Control
1. Variable Resistor (Rheostat)
A variable resistor can be used to control the voltage applied to the motor, thereby controlling its speed.
Pros:
- Simple and easy to implement.
Cons:
- Inefficient due to power dissipation as heat.
- Limited to low power applications.
2. Pulse Width Modulation (PWM)
PWM is a highly efficient method of controlling motor speed by varying the duty cycle of a digital signal.
Pros:
- High efficiency.
- Precise control.
Cons:
- Requires a microcontroller or dedicated PWM controller.
3. Armature Voltage Control
Adjusting the voltage supplied to the armature can control the motor speed.
Pros:
- Provides good speed regulation.
- Suitable for medium to high power applications.
Cons:
- More complex circuitry required.
4. Field Flux Control
Changing the field current to vary the motor’s magnetic field can control the speed.
Pros:
- Suitable for motors with separate field windings.
- Can provide a wide range of speed control.
Cons:
- Can be complex to implement.
Implementing PWM Control
Here’s a basic implementation of PWM control using an Arduino:
Components Needed
- Arduino Uno
- DC motor
- Potentiometer
- Power supply
- Breadboard and jumper wires
Task 4: Ubuntu Command Line
I learnt how the Ubuntu command line works, and created a test folder, opened it, created a test folder, created 2600 folders whose nomenclature is as specified in the task and concatenated 2 text files, all in the Ubuntu CLI.I Found difficult to do this task and with further knowledge about the ubuntu .I could complete the task. I researched about ubuntu from google website & AI to gather more information about it and understand how it works. The pictures of my Task is attached here.
Task 15: Active Participation
My team comprised dedicated and enthusiastic members from the 2nd year of the Electrical and Electronics Engineering (EEE) department at UVCE. Our combined skills and collaborative efforts were pivotal in securing the 2nd place in the SILCO-HACK competition.
Our Project
For SILCO-HACK, our project focused on developing a solution that addressed a significant issue in the field of [specific problem/industry]. We designed and implemented a [brief description of the project], which stood out due to its innovative approach, practical application, and technical sophistication.
Challenges Faced
During the competition, we encountered several challenges:
- Time Constraints: Developing a comprehensive solution within the given timeframe required efficient time management and prioritization of tasks.
- Technical Hurdles: We had to overcome several technical obstacles, including [specific technical challenges].
- Team Coordination: Ensuring seamless communication and collaboration among team members was crucial to our success.
Certificate of Appreciation
We were honored with a Certificate of Appreciation from UVCE, which acknowledges our accomplishment in the SILCO-HACK event. Below is an image of the certificate we received:
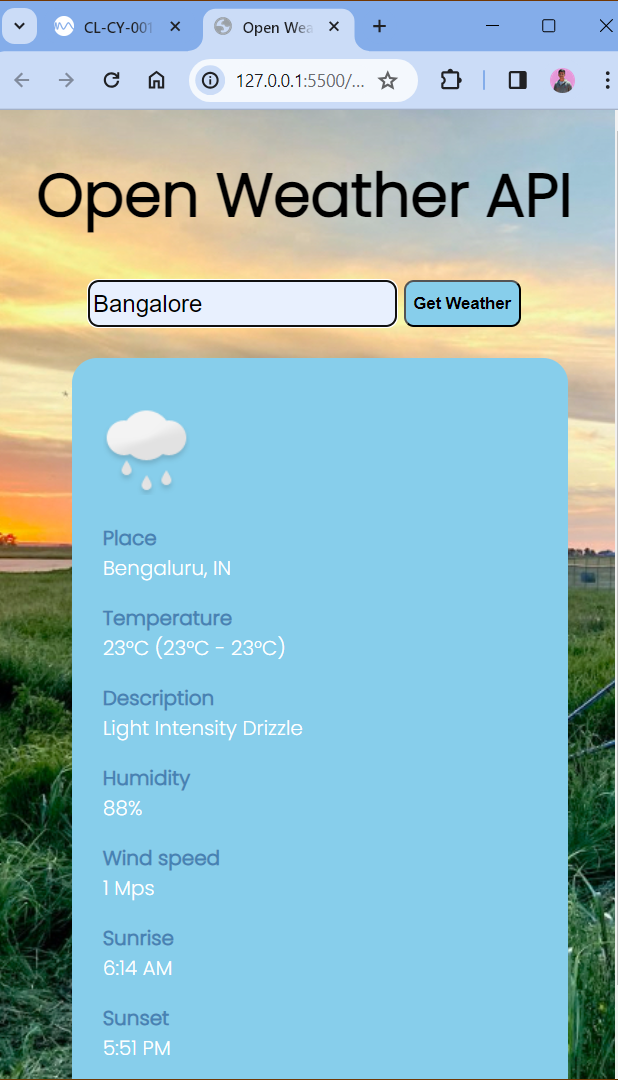
Task 2: API
 An API (Application Programming Interface) is a set of rules and tools that allows different software applications to communicate with each other. It defines the methods and data formats that applications can use to request and exchange information. APIs facilitate the integration of different systems, enabling them to work together seamlessly.
Crux Code:
$(function () {
  $("#myForm").submit(function (e) {
    e.preventDefault();

    var city = $("#city").val();

    getWeather(city);
  });
});

function getWeather(city) {
  $(".weather-temperature").openWeather({
    key: "ea5ceda552fc62d695e46455e0a5ddbb",
    city: city,
    descriptionTarget: ".weather-description",
    windSpeedTarget: ".weather-wind-speed",
    minTemperatureTarget: ".weather-min-temperature",
    maxTemperatureTarget: ".weather-max-temperature",
    humidityTarget: ".weather-humidity",
    sunriseTarget: ".weather-sunrise",
    sunsetTarget: ".weather-sunset",
    placeTarget: ".weather-place",
    iconTarget: ".weather-icon",
    customIcons: "../src/img/icons/weather/",
    success: function (data) {
      // show weather
      $(".weather-wrapper").show();
      console.log(data);
    },
    error: function (data) {
      console.log(data.error);
      $(".weather-wrapper").remove();
    },
  });
}
Task 3: Working with Github
GitHub is a platform that allows developers to automate their software development workflows directly within the GitHub repository. GitHub enables continuous integration and continuous deployment (CI/CD) processes, making it easier for teams to collaborate and streamline their development pipelines.
Forking refers to the process of creating a personal copy of someone else's repository (a collection of files and the entire version history of those files) in a distributed version control system like Git. When you fork a repository, you are essentially creating your own independent copy of the project, which can be modified without affecting the original repository.
A pull request (PR) in GitHub is a proposed code change submitted by a developer for review and integration into the main codebase.
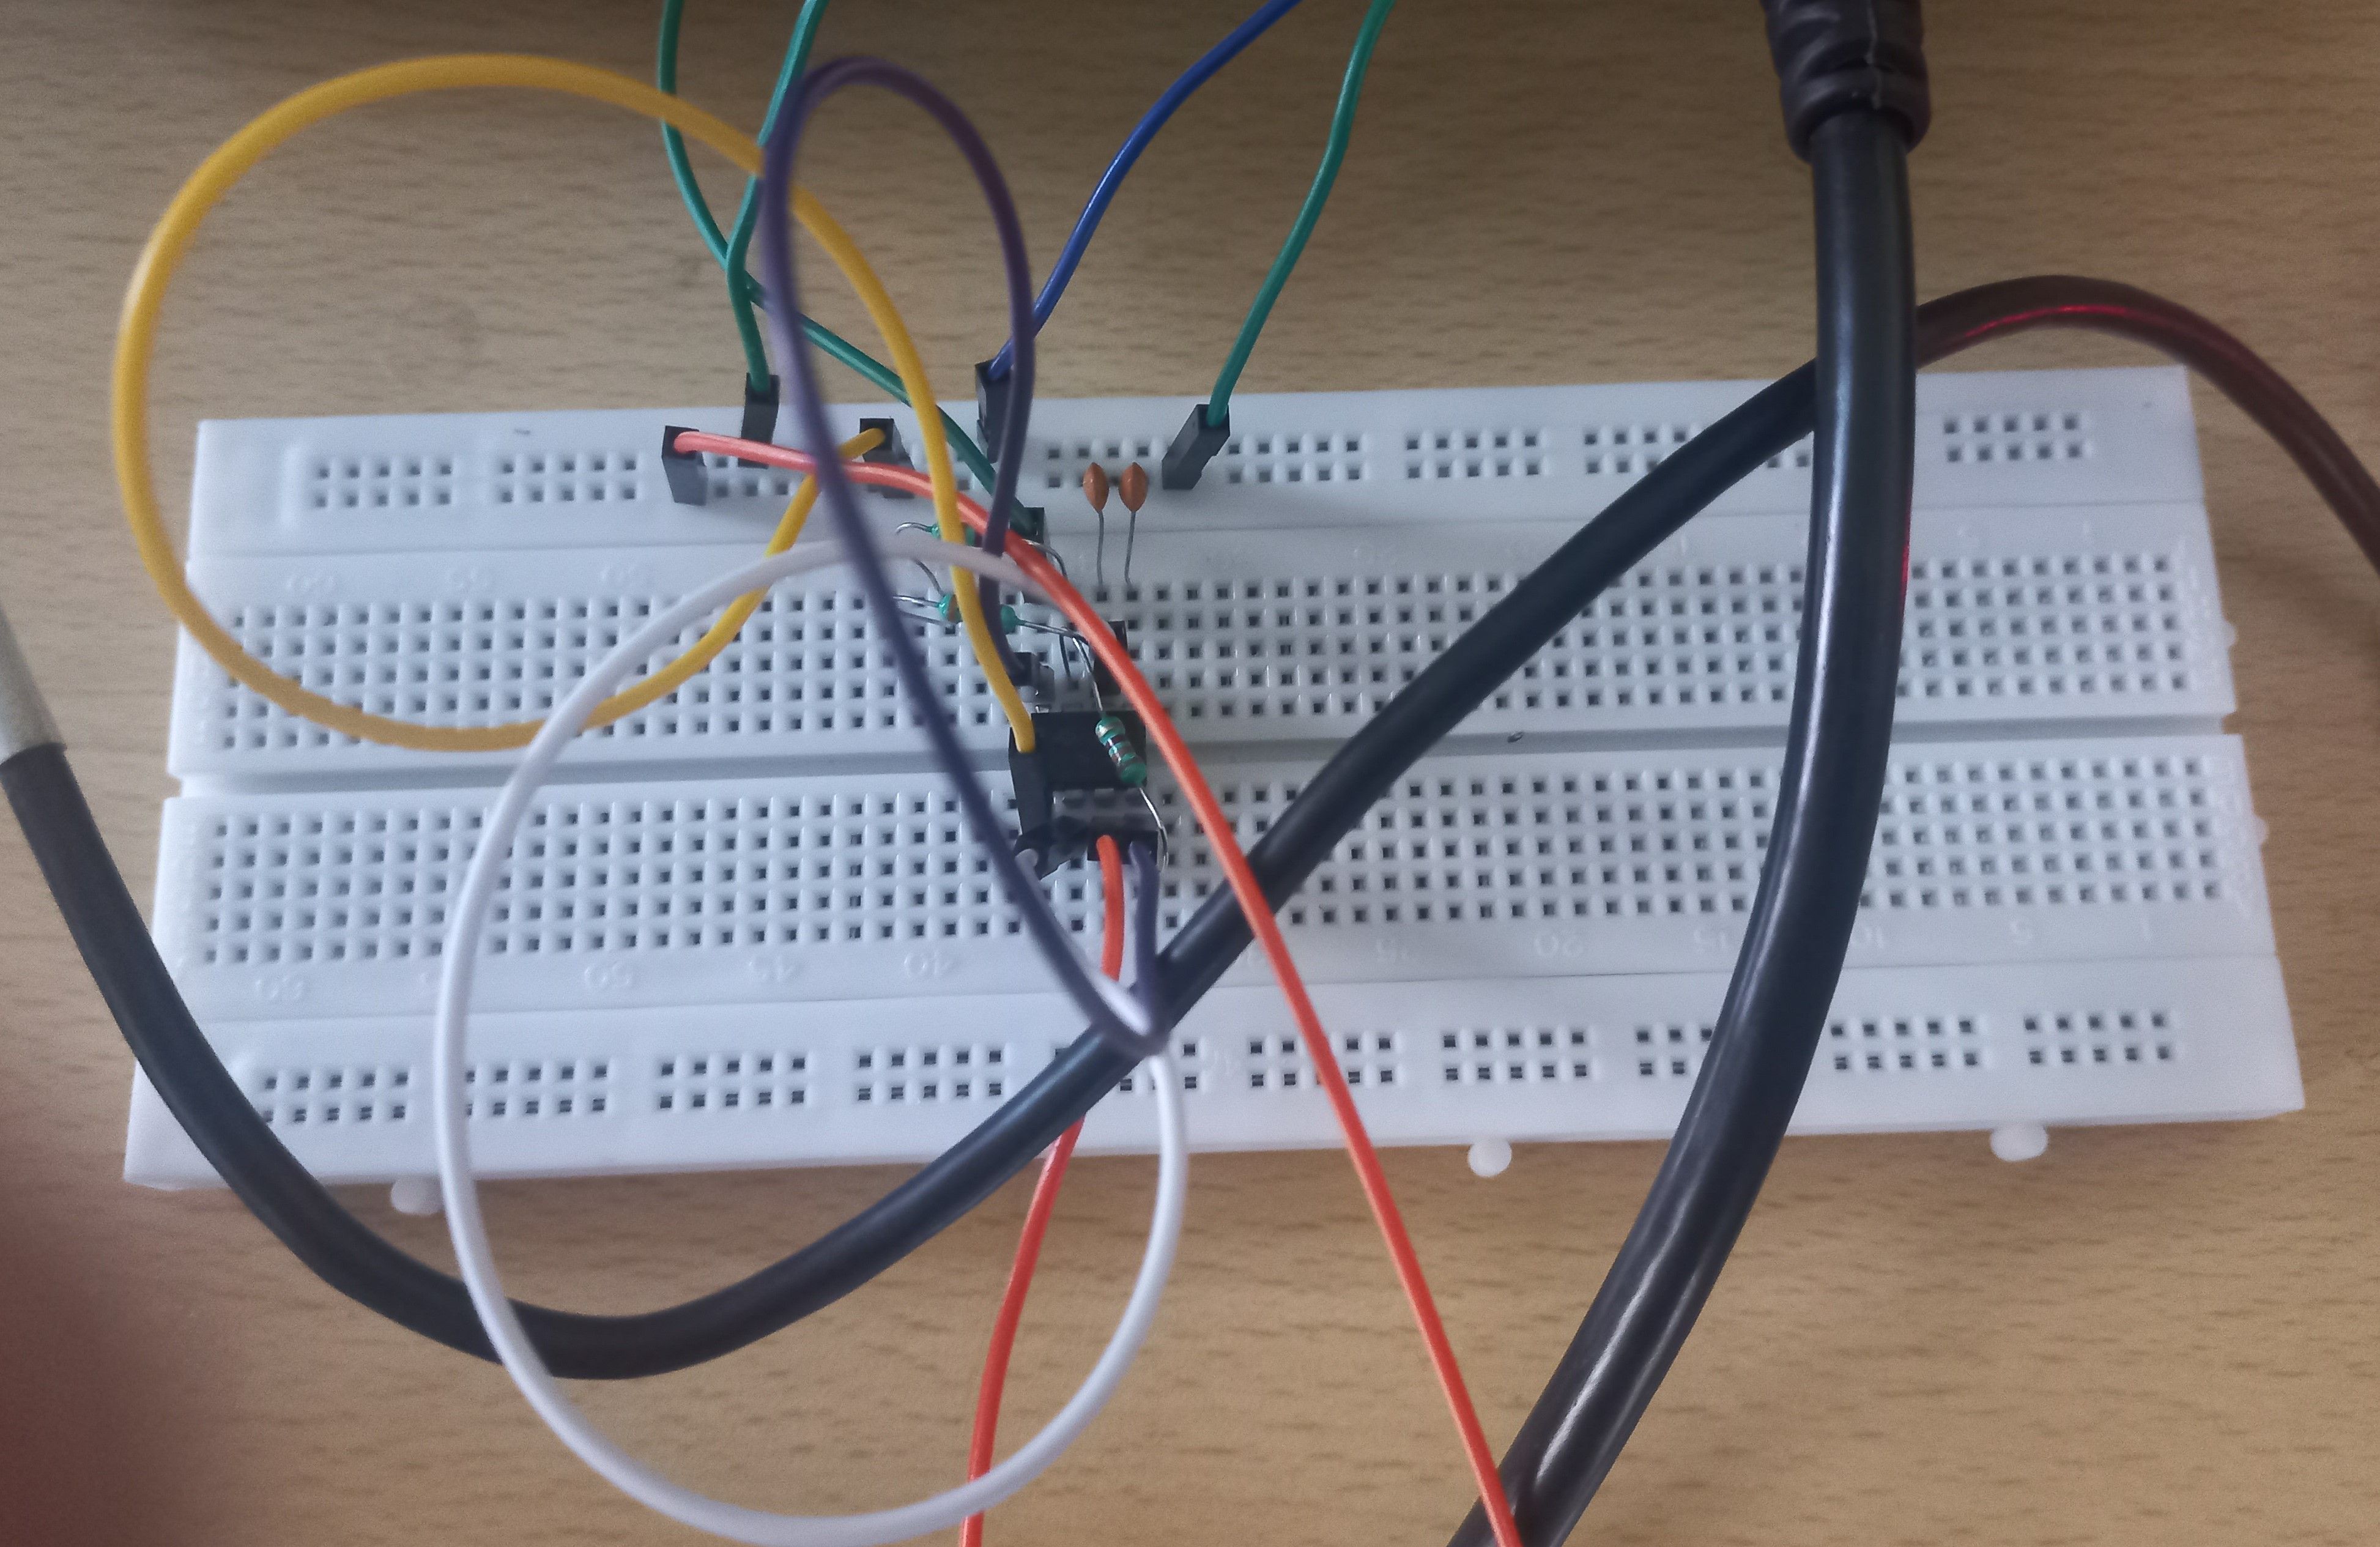
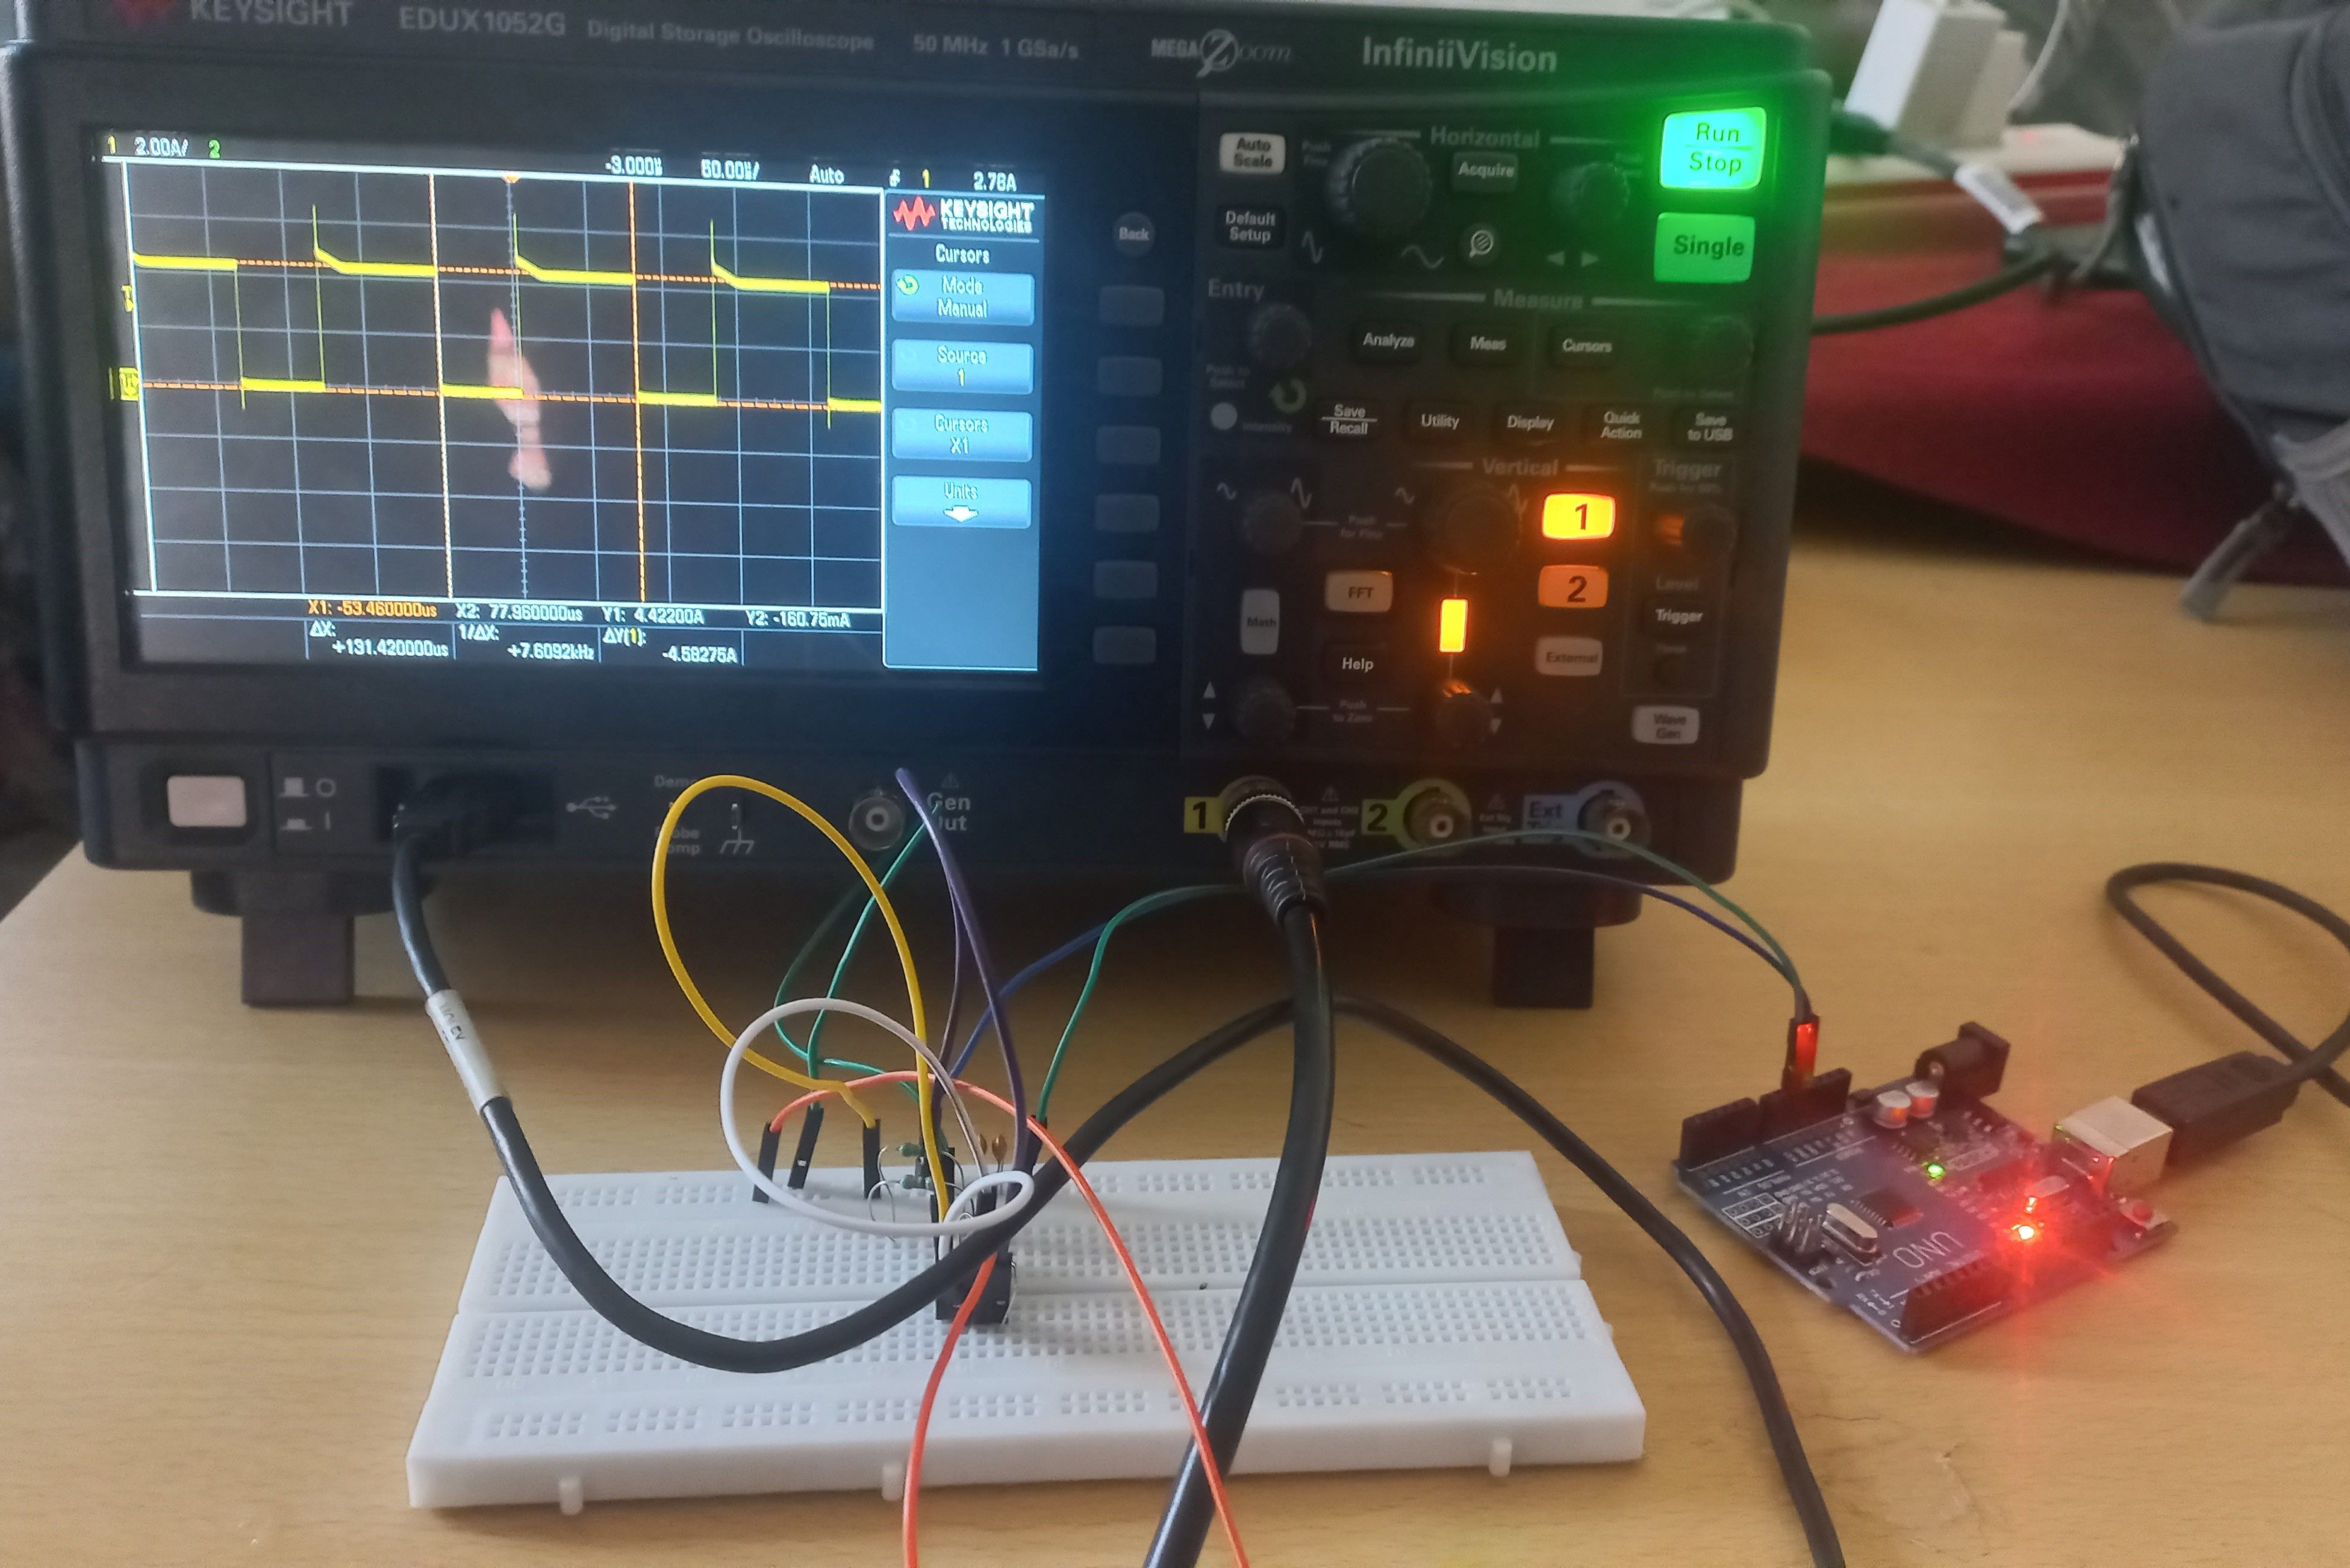
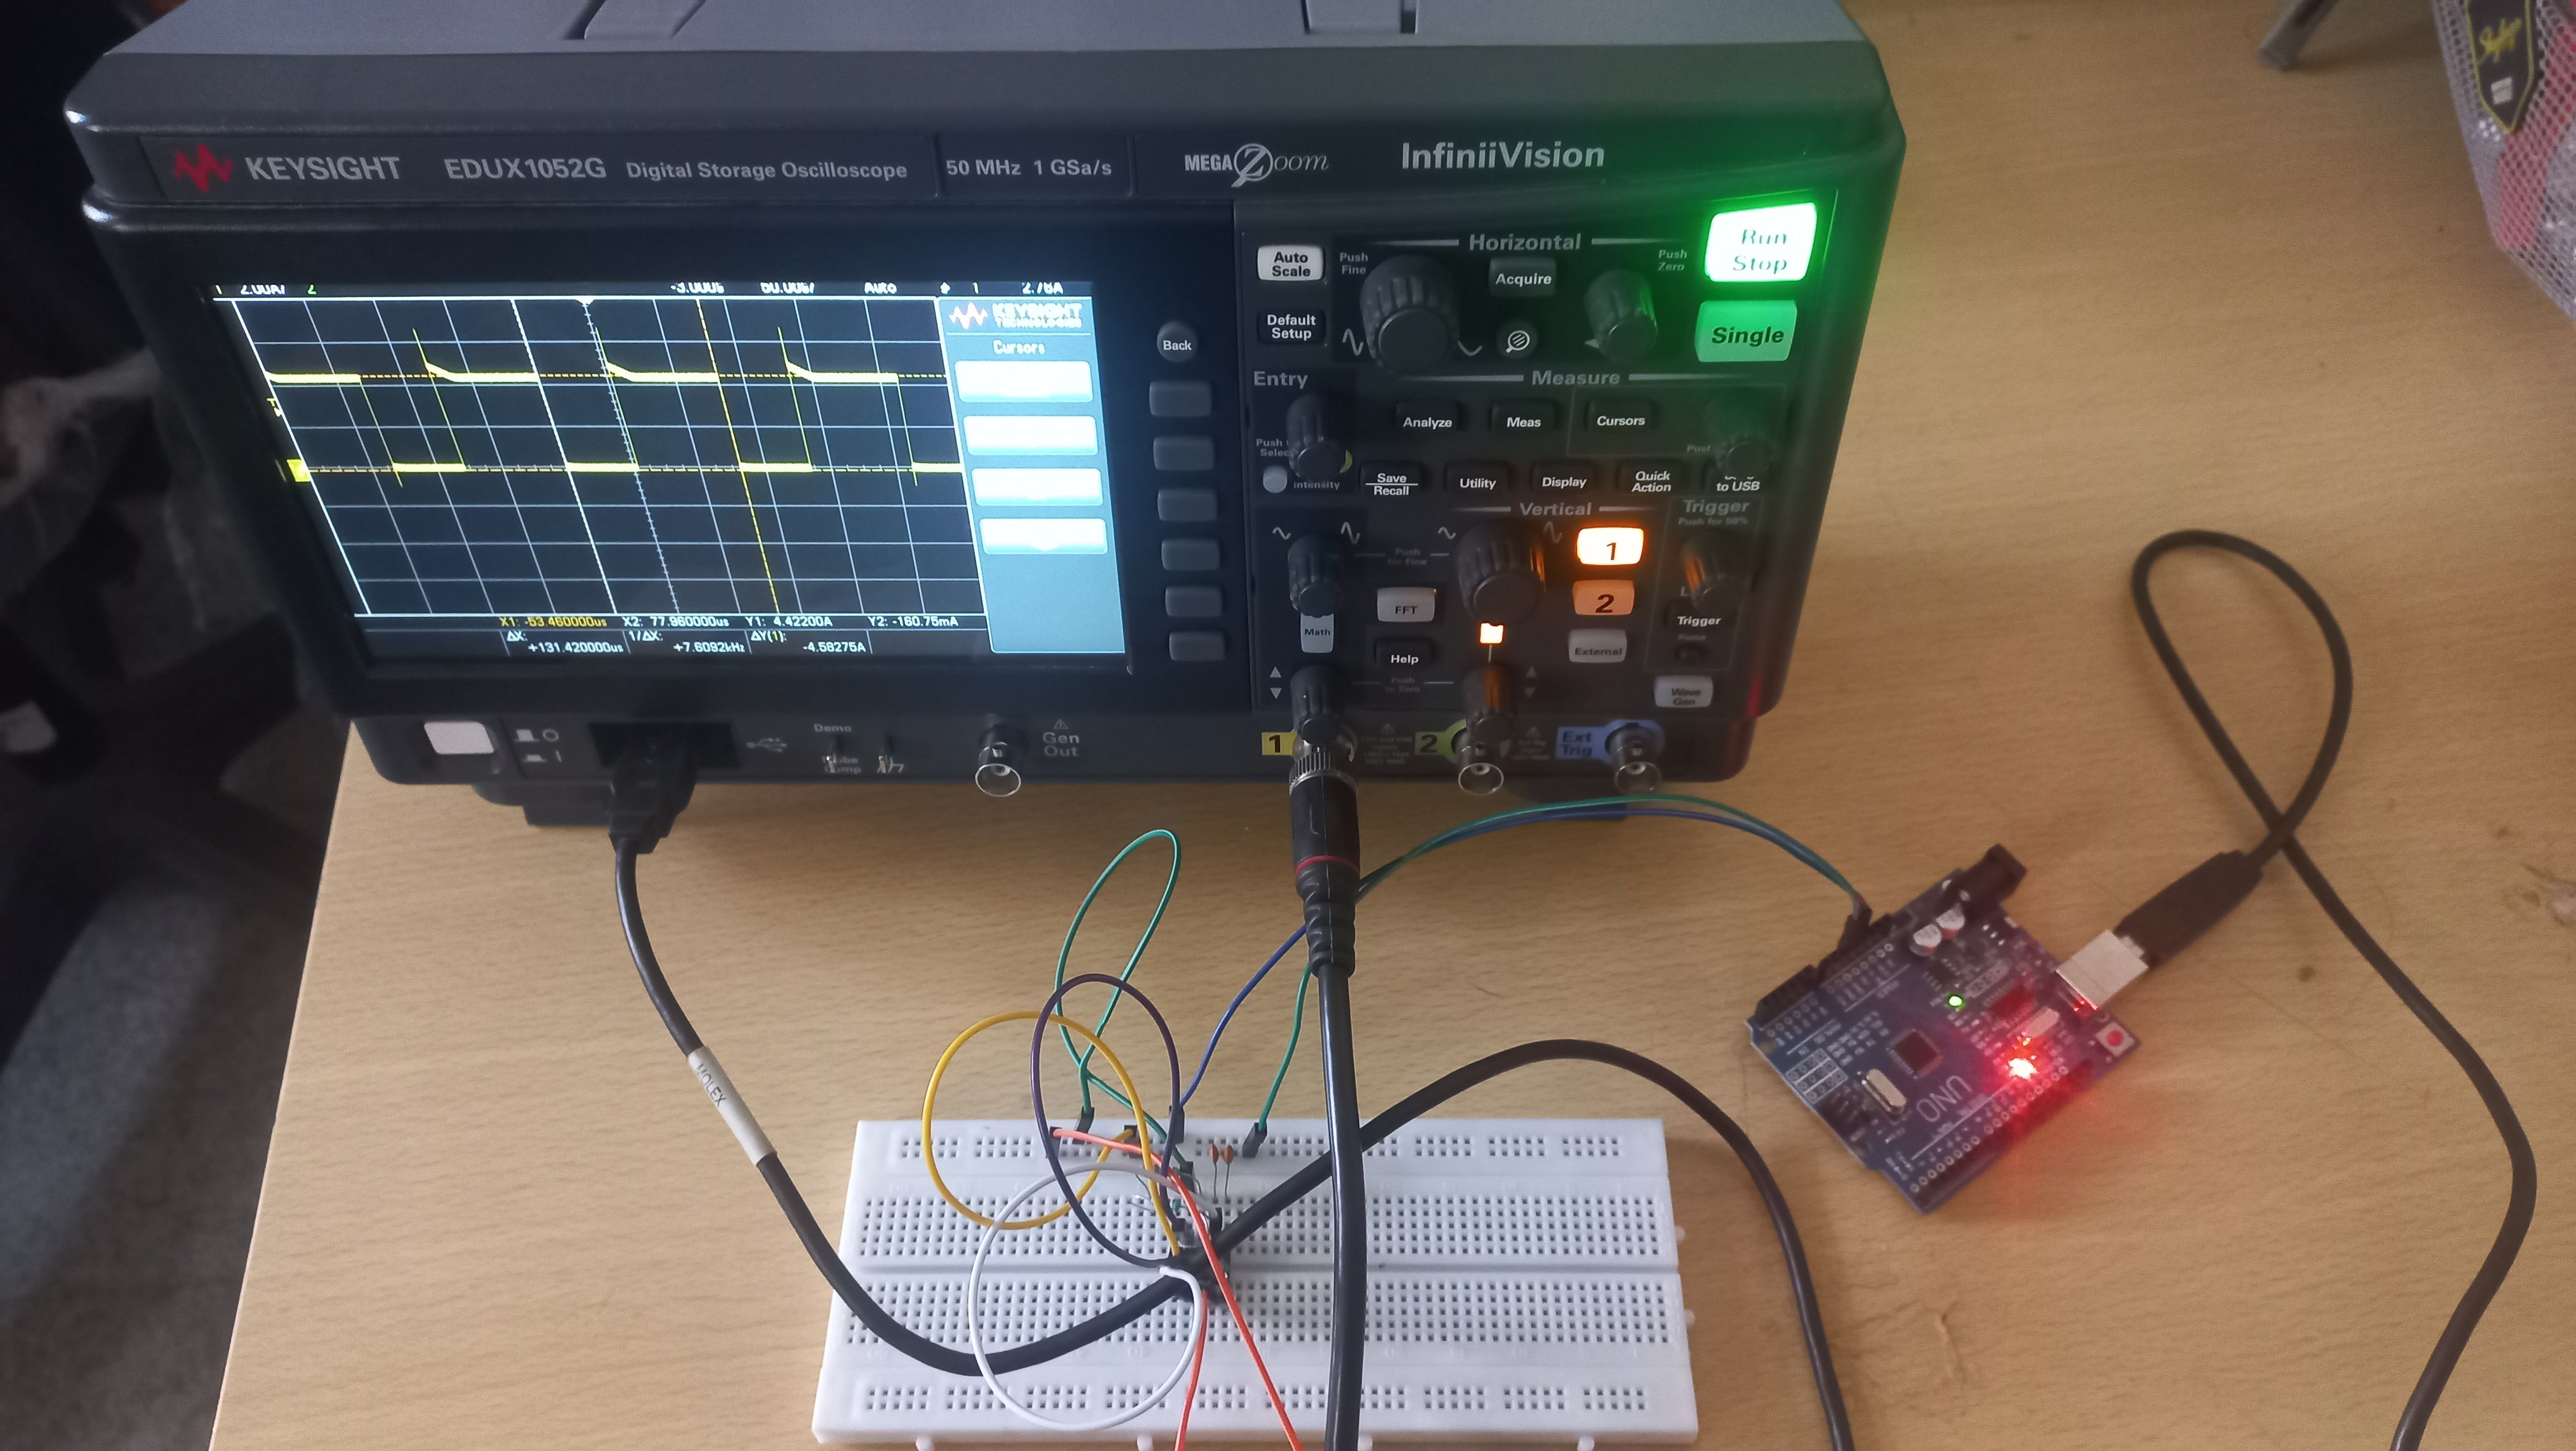
Task 13: 555 Astable Timer
An astable 555 multivibrator is a type of electronic oscillator circuit that uses a popular integrated circuit (IC) known as the 555 timer IC that produces continuous square wave or pulse wave output, commonly used for generating clock signals and timekeeping in digital circuits.
In the astable mode, the 555 timer functions as an oscillator, generating a continuous square wave output. This makes it useful for generating clock pulses, tone generation, and various timing applications.
Why "555"?
The name "555" comes from the three 5-kiloohm resistors used in the original design in its internal voltage divider network.
What is an Oscilloscope?
An oscilloscope is an electronic test instrument used to visualize electrical signals as they vary over time. It displays the voltage of an electrical signal on a two-dimensional graph, with the vertical axis representing voltage and the horizontal axis representing time. This graphical representation is called an oscillogram or waveform.
Task 1: 3D Printing
3D Printers
3D printers are devices that create three-dimensional objects by depositing material layer by layer based on a digital model. The basic operation involves slicing a 3D model into thin layers and then gradually building the physical object by adding these layers on top of each other.
3D printer terminologies
- Bed Temperature: The temperature of the print bed or build platform, which helps in the first layer adhesion and overall print stability.
- Infill Density: The percentage of material used within the interior of a printed object, affecting its strength, weight, and print time.
- Layer Height: The thickness of each individual layer of filament laid down during the printing process, impacting print resolution and time.
- Print Speed: The speed at which the 3D printer head or nozzle moves while laying down the filament, influencing the print quality and duration.
- Support Structures: Additional, often temporary, material printed to support overhanging features during the printing process, which are removed after completion.
My 3D printing model - A bird without head
