COURSEWORK
Yuktha's IOT-001 course work. Lv 1
| Yuktha Yamini | AUTHOR | ACTIVE |
YUKTHA’S IOT-LEVEL 01 REPORT
11 / 9 / 2025
YUKTHA’S IOT-LEVEL 01 REPORT
TASK1: API
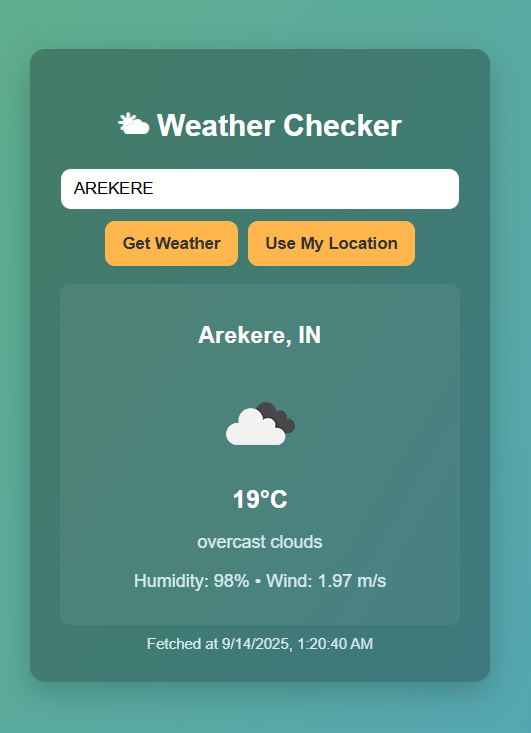
An API (Application Programming Interface) is a set of rules and tools that allows two applications to communicate with each other. It works as a bridge between a client (like a web or mobile app) and a server (where the data is stored). In this project, the app makes a request to an API, which processes the request and sends back the required data in a structured format (usually JSON). For example, when a user enters a city name, the app sends a request to the weather API, which returns details like temperature, humidity, and conditions. The app then extracts this data and displays it in a user-friendly way. This shows how APIs simplify access to external services and make applications more interactive.
TASK 2: WORKING WITH GIT HUB
GitHub is a widely used platform where developers can collaborate, manage versions of their code, and contribute to projects. As part of this task, I explored how to work with repositories using GitHub workflows. I began by forking the given repository so that I could work on a copy without affecting the original project. Next, I created a new branch to make my changes in an organized way.After updating the code, I committed the changes with a proper message to keep track of the modification. Finally, I created a pull request so that my contribution could be reviewed and merged into the main repository.

TASK 3: GET FAMILIAR WITH UBUNTU COMMAND LINE AND DO THE FOLLOWING SUBSTASKS:
The command line in Ubuntu allows us to interact with the operating system directly using commands. In this task, we first create a folder named test and move into it using cd. Then, we create a blank file without opening any editor and check the files in the folder using the ls command. After that, we generate multiple folders using a loop command. Finally, we concatenate the contents of two text files and display them on the terminal. This helps us practice basic file and folder operations, looping, and text handling in the Linux command line.

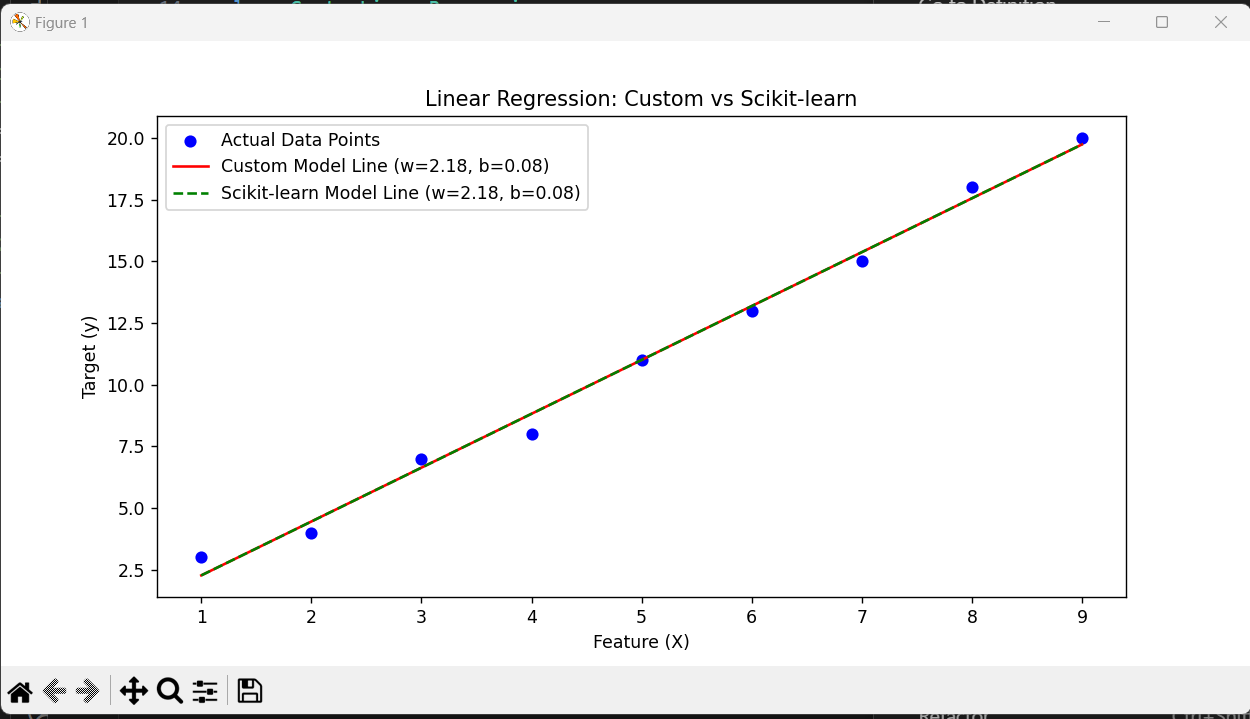
TASK 4: BUILD YOUR OWN BRAIN -LINEAR REGRESSION FROM SCRATCH
I implemented linear regression from scratch by applying the gradient descent algorithm to optimize model parameters. The performance of this custom model was then compared with the scikit-learn Linear Regression implementation. Visualization was done by plotting the regression line alongside the data points.
TASK 5: THE MATRIX PUZZLE
In this task, we work with NumPy and Matplotlib to solve a visual puzzle. We are given a scrambled matrix that hides an image. Using NumPy operations, we rearrange, reshape, or flip the matrix in the correct order. After fixing it, we display the hidden image

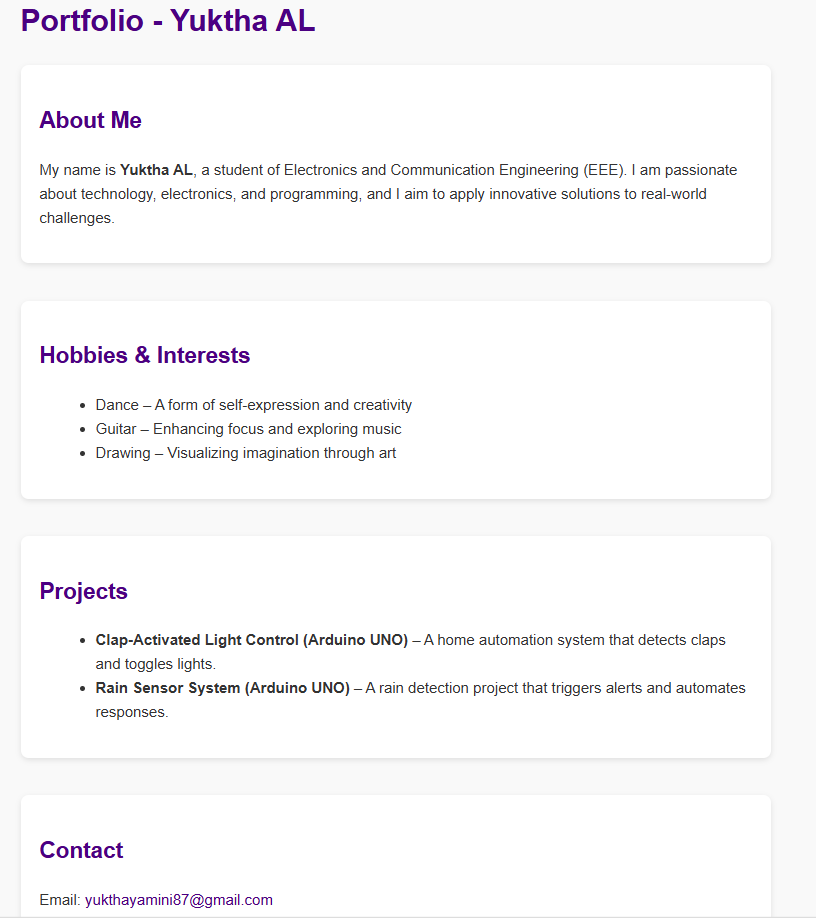
TASK 6: CREATE A PORTFOLIO WEBPAGE
I created a personal portfolio website to showcase my details, interests, and projects. The site also includes links to my social media profiles. I made it responsive using HTML, CSS LINK OF THE CODE
TASK 7: Tinkercad
I created a Tinkercad account and explored the example circuits to understand how the platform works.Then, I simulated a simple circuit using an ultrasonic sensor to measure the distance of an obstacle and displayed the result on the serial monitor.Next, I built a radar system by combining the ultrasonic sensor with a servo motor to rotate and detect objects in a wider range. I learned about Tinkercad, how ultrasonic sensors and servo motors work, and how radar technology can be simulated.

TASK 8: Speed Control of DC Motor
I learned how to control the speed of a DC motor using an Arduino UNO and the L298N motor driver.First, I simulated the circuit on Tinkercad to test the connections.Then, I performed the same setup on hardware with a 5V BO motor. This helped me understand motor speed control using PWM and H-Bridge driver.


TASK 9: LED Toggle Using ESP32
I worked with the ESP32 microcontroller to control LED lights wirelessly.The ESP32 was connected on a breadboard along with LEDs and resistors.I uploaded code through the Arduino IDE, which connected the ESP32 to my mobile hotspot.By entering the IP address shown on the serial monitor into my phone’s browser, I was able to switch the LEDs on and off remotely.


TASK 10: Soldering Prerequisites
I learned about the soldering tools like soldering iron, solder wire, flux, and wick. With the help of a coordinator, I practiced basic soldering on a perf board As an example, I soldered a small LED circuit.,This helped me understand the use of soldering equipment and basic circuit assembly.

TASK 11: 555 TIMER IC
I designed a 555 timer circuit in astable mode with a 60% duty cycle.I built the circuit on a breadboard using the required components.Then, I used probes to observe the output waveform of the circuit.This helped me understand how a 555 timer generates continuous pulses.

TASK 12: Karnaugh Maps and Deriving the logic circuit
I analyzed 4 cases using Karnaugh Maps based on door and key conditions. From the K-map, I derived the simplified logic expressions.I built a simple logic circuit using gates so that a buzzer or LED activates under specific conditions.

TASK 13: Active Participation
I participated in the Proud UVCEian 5K Run/Walk It was a great experience to interact with alumni and hear about their journey. The event was full of energy and brought together students and graduates in one place.I enjoyed being part of the run and felt proud to celebrate the UVCE spirit.

TASK 14: Datasheets report writing:
1. Introduction
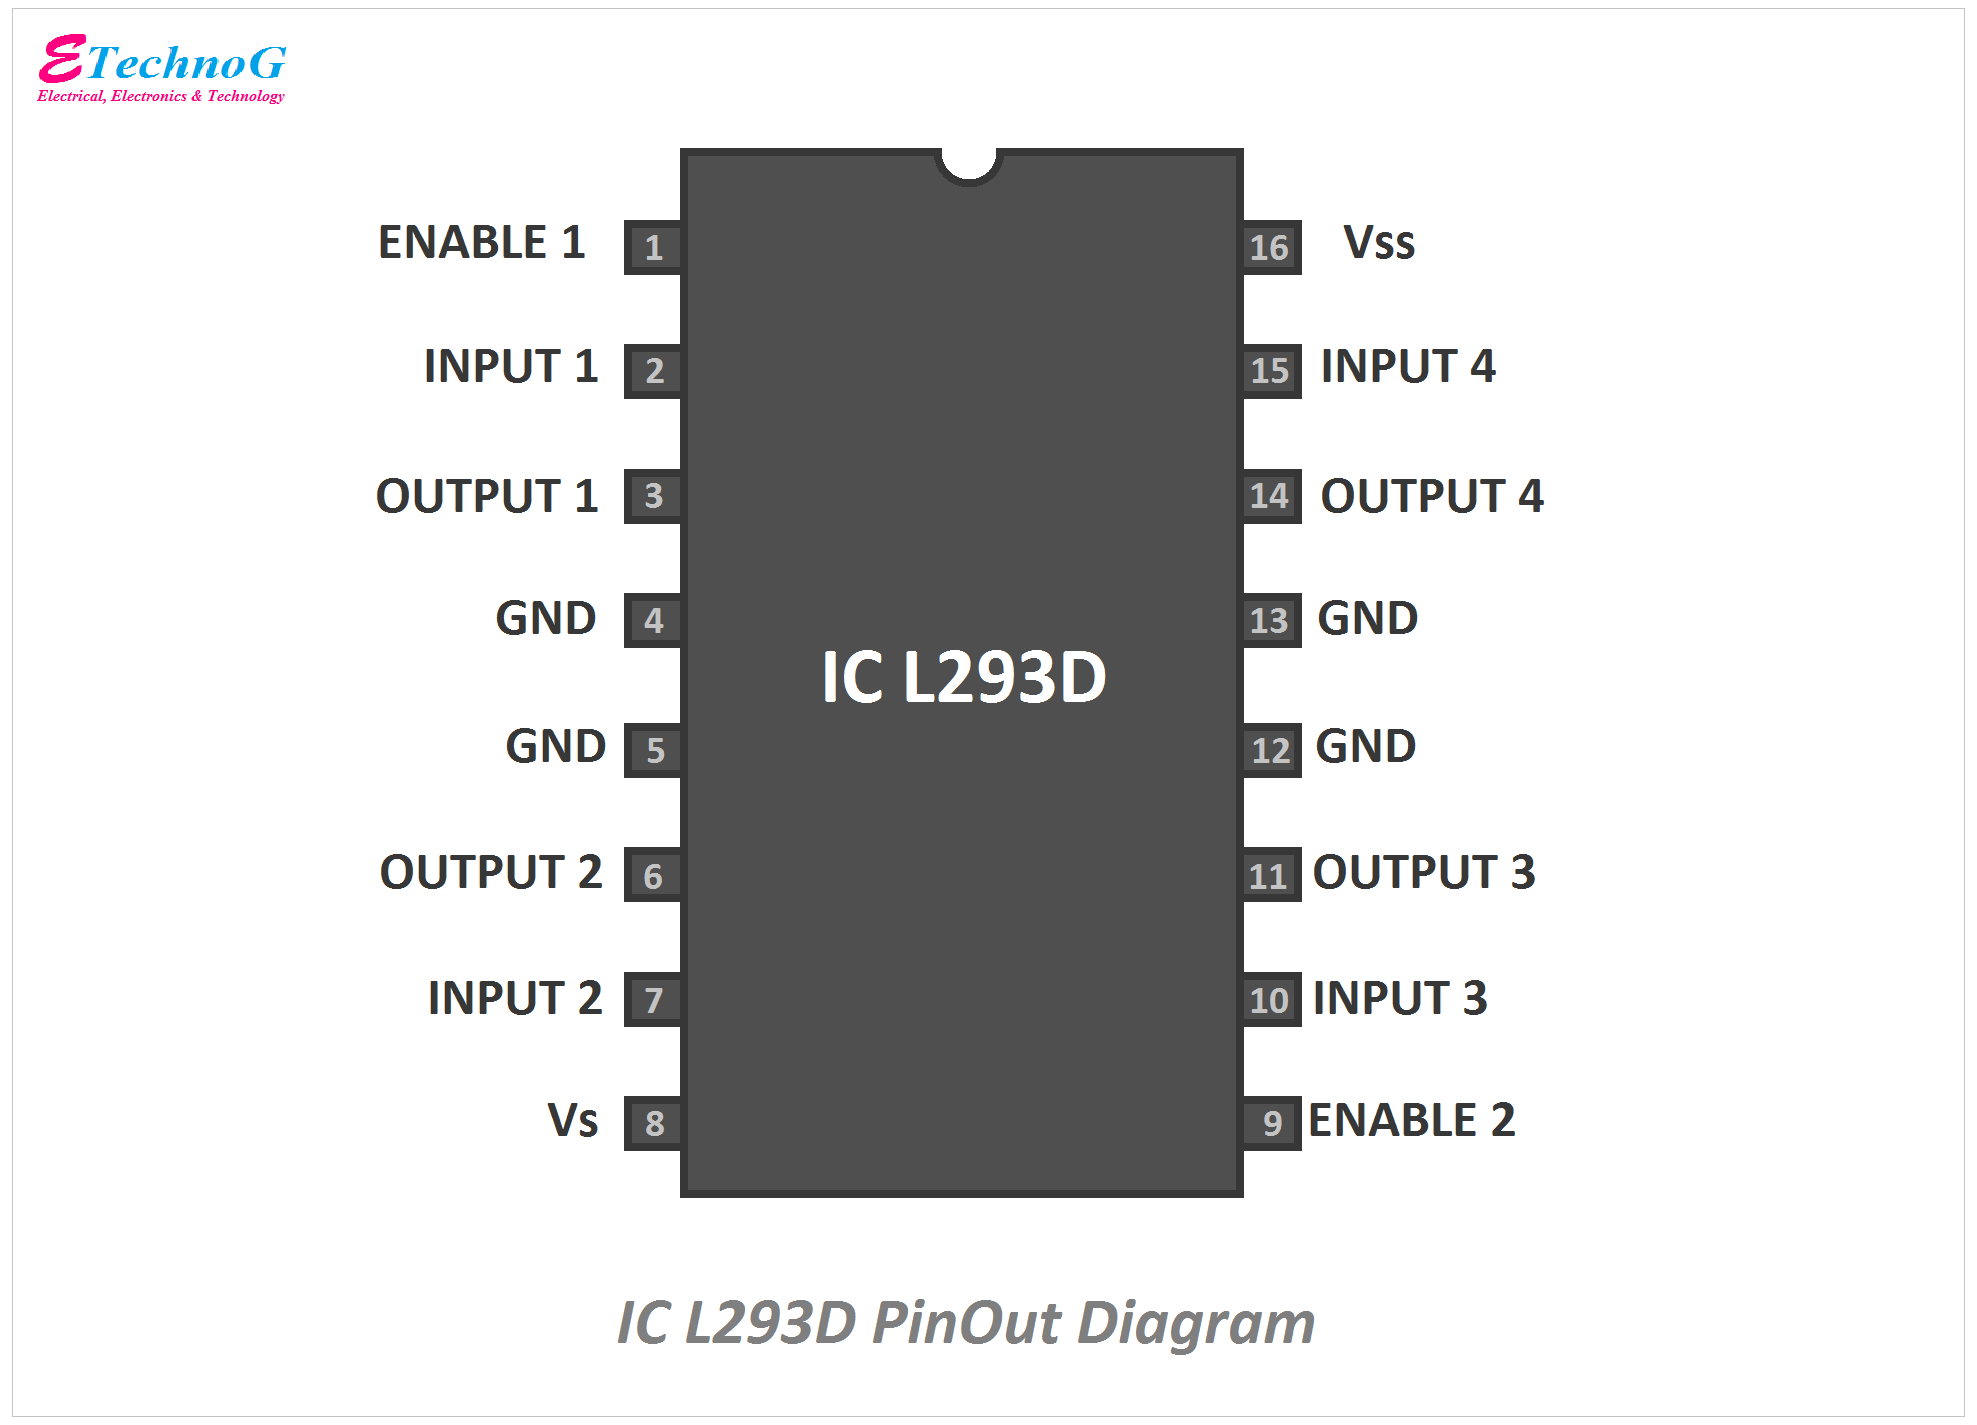
The L293D is a quadruple high-current half-H driver IC designed for driving DC motors and stepper motors.
It allows a microcontroller (which operates at low current) to control motors requiring higher current and voltage.
2. IC Details
• Technology: Bipolar junction transistors
• Max Output Current: 600 mA per channel (1.2 A peak)
• Voltage Range: 4.5V – 36V
• Package: 16-pin Dual-Inline-Package (DIP)
3. Internal Working
The L293D uses H-Bridge circuits internally.
H-Bridge Concept:
• An H-bridge allows a motor to be driven forward, reverse, stopped, or free-running by controlling current direction.
• By switching transistors ON/OFF in a certain configuration, current flows in both directions.
4. Pin Configuration
• Input pins (IN1–IN4): Signals from microcontroller.
• Output pins (OUT1–OUT4): Connected to motor terminals.
• Enable pins (EN1, EN2): Used for PWM speed control.
• VCC1: 5V logic supply.
• VCC2: Motor supply voltage (up to 36V).
5. PWM (Pulse Width Modulation) Control
• The Enable pins (EN1, EN2) can be given a PWM signal from a microcontroller.
• By varying the duty cycle, motor speed can be controlled
o Higher duty cycle → Higher average voltage → Faster motor
o Lower duty cycle → Slower motor.
6. Applications
• Driving DC motors in robotics.
• Stepper motor control.
• Automated gates, fans, conveyor systems.
Task 15: Introduction to VR
VIRTUAL REALITY (VR): I recently used a Virtual Reality (VR) headset, which helped me understand how to operate its controls and also gave me clarity on how VR differs from Augmented Reality (AR).Virtual Reality (VR) is a technology that creates an entirely computer-generated three-dimensional environment where users can look around, move, and interact. The main purpose of VR is to immerse the user so deeply that the physical world is replaced by the virtual one. This is usually made possible through a head-mounted display (HMD) that provides a 3D view, along with accessories like handheld controllers, sensors, and haptic devices that track body movement and provide realistic feedback.
Augmented Reality (AR), in contrast, does not replace the real world but enhances it by adding digital elements to the physical environment. AR blends computer-generated images, text, or objects with what the user actually sees. This is typically experienced through smartphones, tablets, or smart glasses, which use a camera and display to project digital information onto the real world.
DIFFERENCE BETWEEN VR AND AR:
| VR | AR |
|---|---|
| VR completely replaces what people see and experiance | AR adds to the real world scene. |
| In a virtual reaity experiance,users are fully immersed | It is open and only partialy immersed |
| Enabed through VR headsets such as Google Daydream,Oculus Go etc | Enabled through devices such as AR glasses,smart lenses etc |
| VR samples: Smallworlds and Second life. | AR samples: Snapchat lenses,IKEA's place. |
INDIAN COMPANIES AT VR AND AR
There are many companies are developing VR and AR:
Imaginate:
It started as an AR ,VR,MR company. That provided custom made 3D content for immersive training and support for various equipment and processes.
Paralax Labs :
It is a Mumbai-based startup for the defence and enterprise sectors.
*Tata ELXSI and many other companies.