COURSEWORK
Sidhant's EV-RE-001 course work. Lv 1
| Sidhant Mense | AUTHOR | ACTIVE |
Level 001
18 / 8 / 2026
Task 01 - 3D Printing
Objective: Understand the working of a 3D printer, check out the online resources. Understand what's an STL file, and then learn to slice it. Go through the SOP'S regarding the 3d printer. Learn about bed temperature, infill density and other printer settings. Finally get an STL file from the internet, and slice it and put it for print.
Outcomes and Learnings: I explored the basic concepts of 3D printing and learned how it works, including understanding parameters such as bed temperature and materials like PLA. I used the Thingiverse website to download the model’s STL file.
After configuring the settings, the model was sliced, which converts the 3D model into multiple printable layers. The estimated printing time was_____ minutes. The printer used for this 3D printing process was the __________ .
Finally, I successfully printed a Batman logo as my 3D printed model.
Task-2 API
Objective: Learn what an API is and how it works. Using any API of your choice, build a user interface (web app, mobile app, etc.) to make calls and display information.
Outcomes and Learning: Through this project, I learned about APIs (Application Programming Interfaces). An API acts as an intermediary between digital applications, allowing them to communicate with each other and exchange data, code, and functionality. In this project, I developed a Weather Application that retrieves real-time weather data from the OpenWeather website using its API. The application sends a request to the API, fetches the weather data, and displays the information on the user interface To access the weather data, I used an API key provided by the OpenWeather platform.
Click here to access the API code. image

Task 03 - Working with Github
Objective: Familiarize yourself with GitHub integrated workflows (GitHub actions), Issues, and pull requests with this task. Outcomes and Learnings
Through this task, I learned how to create and delete my own repositories on GitHub. I also learned how to contribute to other people's repositories.
First, I forked the given repository to my GitHub account and then cloned it to my local machine. After cloning the repository, I made the required change in the code by removing the +1 as instructed. I then committed the change and pushed it to my forked repository.
Finally, I created a pull request to submit my changes to the original repository.

Task 04 - Get familiar with the command line on ubuntu and do the following subtasks:
Objective: Get familiar with Command lines on Ubuntu and do the subtasks as given on MARVEL website. Outcomes & Learnings: I learned the use of the below commands in Ubuntu:
- Create a folder named test : mkdir test
- To change directory : cd test
- Create a blank file : touch blank.txt
- List files in the terminal : ls
- Create 2600 folders : mkdir M{0001..2600}
- Concatenate and display two text files : cat text1.txt text2.txt

Task 05 - Build Your Own Brain -Linear Regression from Scratch
Objective: Dive into the core of machine learning by implementing Linear Regression from scratch using , and compare its performance with the scikit-learn implementation. Use the California Housing dataset to evaluate your model on real-world data.
Outcomes & Learning:
- I learned the basic concept of Linear Regression and how it predicts values by fitting a straight line to the data points.
- I implemented Linear Regression from scratch using Python without using machine learning libraries.
- I understood how Gradient Descent updates weights and bias to reduce prediction error.
- I learned how to visualize data using graphs such as scatter plots and regression lines.
- I compared my custom implementation with scikit-learn's LinearRegression model.
- I learned how to evaluate model performance using metrics like MSE, MAE, and R² score.
- This task helped me understand the internal working of regression models and the benefits of using built-in machine learning libraries.

Task 06 - The Matrix Puzzle — Decode with NumPy & Reveal the Image
Objective: The objective of this task is to understand how NumPy can be used to manipulate matrices and decode a scrambled matrix to reveal a hidden image using visualization with Matplotlib.
Outcomes and Learnings
- I learned how to work with matrices using NumPy.
- I understood how matrix operations can be used to decode scrambled data.
- I learned how to visualize matrices as images using Matplotlib.
- I understood how numerical data can represent visual information.
- This task helped me improve my understanding of array manipulation and data visualization in Python.

Task 07 - Create a Portfolio Webpage
Objective: Create a website to showcase your portfolio - about yourself, interests, projects, social media profiles and more. It has to be responsive and also pushed to the git repository. CSS can be of your choice and any framework can be used.
Outcomes & Learnings: I have learnt basic CSS and HTML to create a Portfolio website to show information about myself. I hosted my website on Github to make it accessible to all.
https://sid-132006.github.io/portfolio-webpage/

Task 08 - Writing Resource Article using Markdown
🌐 Introduction to Web Development
Web development is the process of building websites and web applications that run on the internet. It includes designing, coding, and maintaining websites.
🧩 Types of Web Development
1. Frontend Development
Frontend is what users see on the website.
- HTML (Structure)
- CSS (Styling)
- JavaScript (Functionality)
2. Backend Development
Backend works behind the scenes.
- Server handling
- Databases
- APIs
Languages used:
- Node.js
- Python
- Java
3. Full Stack Development
A full stack developer works on both frontend and backend.
⚙️ Tools Used in Web Development
- VS Code (Code Editor)
- Git & GitHub (Version Control)
- Browser (Chrome, Firefox)
🚀 How a Website Works
- User enters a URL
- Browser sends request to server
- Server processes request
- Response is sent back
- Website is displayed
🔗 Useful Resources
🎯 Conclusion
Web development is a powerful skill that allows you to build amazing websites and applications. With practice, anyone can become a web developer.
Task 10 - Speed Control of DC Motor
Objective: Understand the control DC motors using the L298N motor driver and the Arduino board. Using an UNO and H-Bridge L298N motor driver, control the speed of a 5V motor.
Outcomes and Learnings: This task made use of an Arduino uno board and a motor driver(L298N). The potentiometer is embedded on the breadboard and rotated to vary the speed of the DC motor

Task 11 - LED Toggle Using ESP32
Objective: To understand the working of the ESP32 and create a standalone web server using ESP32 to control an LED connected to its GPIO pins.
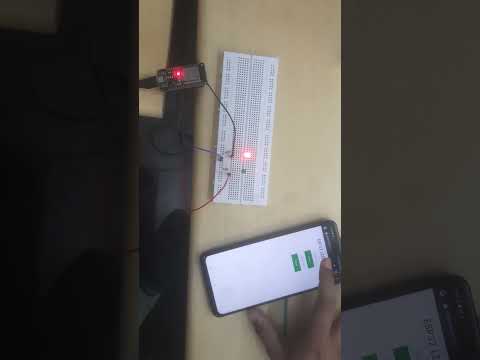
Outcomes and Learnings: In this task, I used an ESP32 microcontroller and two LEDs, which were controlled through the Arduino IDE. The first step was to upload the required code to the ESP32. Then, I entered the mobile hotspot Wi-Fi credentials in the code so that the ESP32 could connect to the network. After uploading the code, the ESP32 generated an IP address. By entering this IP address into a web browser, a web page opened where I could toggle the LEDs on and off. Through this task, I learned how ESP32 can be used to create a simple web server and control devices using a web interface.

🎥 Project Demo 👇
 )
)
Task 12 - Soldering Prerequisites
Objective: To learn about the soldering equipment and perform basic soldering on a perf board, such as building a simple LED circuit.
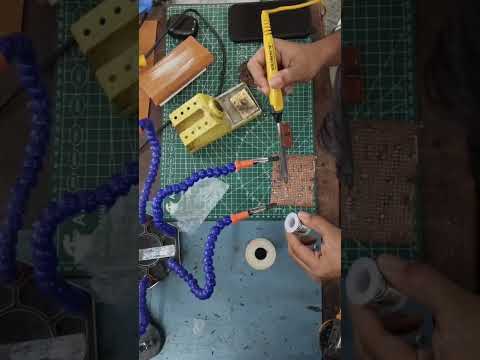
Outcomes and Learnings: I soldered a simple LED circuit on a perf board. The soldering iron was set to a temperature of around 300°C during the process. This helped me understand how to use soldering equipment and perform basic soldering safely.
LED Soldering Video
🎥 LED Soldering Video 👇
 )
)
Task 13 - 555 IC astable multivibrator with 60% duty cycle
Objective: Design a 555 IC astable multivibrator with 60% duty cycle.
Outcomes and Learnings: I learnt about Integrated Circuits and timer made for electronic circuits using 555 IC. An oscilloscope was used to read the wave form and detect the duty cycle. The duty cycle obtained was 60.22%.
This is the connection that is to be made on the breadboard.
Experimental Setup


Task 13 - 555 IC astable multivibrator with 60% duty cycle Objective: Design a 555 IC astable multivibrator with 60% duty cycle.
Outcomes and Learnings: I learnt about Integrated Circuits and timer made for electronic circuits using 555 IC. An oscilloscope was used to read the wave form and detect the duty cycle. The duty cycle obtained was 60.22%.
This is the connection that is to be made on the breadboard.
Experimental Setup Soldering LED Circuit
Soldering LED Circuit
LED Soldering Setup
Task 14 - Karnaugh Maps and Deriving the logic circuit
K-Map & Deriving Logic Gates – Burglar Alarm Objective: Determine the Karnaugh Map (K-map) and design a burglar alarm using simple logic circuits. The buzzer or LED activates when certain conditions are met. Push buttons can be used to represent the door and key inputs.
Outcomes and Learnings: The burglar alarm system is an electronic circuit that detects unauthorized entry and activates an alarm. This system activates the alarm when the door is open and the key is not pressed.
The alarm works based on the following conditions:
- D denotes the Door
D = 0 → Closed Door D = 1 → Open Door K denotes the Key
-
K = 0 → Key is not inserted in the door K = 1 → Key is inserted in the door A denotes the Burglar Alarm
-
A = 0 → Alarm OFF A = 1 → Alarm ON Truth Table Door (D) Key (K) Alarm (A) 0 0 0 0 1 0 1 0 1 1 1 0 From the truth table, the alarm is activated only when the door is open and the key is not inserted.
Karnaugh Map D \ K 0 1 0 0 0 1 1 0 After simplifying the K-map, the Boolean expression is:
A = D · K'
Where:
- D = Door open
- K' = Key not inserted (NOT K)
Logic Circuit
The logic circuit can be implemented using:
One NOT gate One AND gate Steps:
The key input passes through a NOT gate. The door input and inverted key signal are connected to an AND gate. The output of the AND gate activates the alarm (LED or buzzer). Simulation Push buttons are used to represent the door and key inputs. When the door is opened without inserting the key, the alarm (LED or buzzer) is activated.
Conclusion
Using Karnaugh Maps simplifies Boolean expressions and helps design efficient digital logic circuits. In this project, a burglar alarm system was implemented using basic logic gates based on the conditions of the door and key.
Task 15 - Active Participation
I received a certificate at Kagada 2025 for Poster Making, where I presented a project on generating energy through hydrolysis to power a movable car. The project demonstrated how chemical reactions can be used to produce energy and convert it into mechanical motion for sustainable transportation concepts.

Task 16 - Datasheets report writing
📘 Datasheet Report: LM35 Temperature Sensor
To study the datasheet of the LM35 temperature sensor and understand its specifications, working principle, and applications in temperature measurement system.