
COURSEWORK
Shashank's IOT-001 course work. Lv 1
| Shashank GS | AUTHOR | ACTIVE |
Level Zero Task report (Shashank GS)
15 / 3 / 2026
Task 1: 3D Printing
Objective
The objective of this task was to understand the basic working of a 3D printer, learn about STL files and slicing, and become familiar with important printer settings such as bed temperature, infill density, and other printing parameters.
What I Did
For this task, I first studied how 3D printing works and learned about the different types of 3D printing technologies. I also understood what an STL file is and how it represents a 3D model that can be used for printing.
Next, I learned how to use slicing software such as Ultimaker Cura or Creality Slicer to convert an STL file into printer instructions (G-code). While slicing the model, I explored various printer settings including bed temperature, infill density, layer height, and print speed.
Outcome
Through this task, I learned the basic workflow of 3D printing, including preparing STL files, slicing models, and configuring printer settings.
Task 2: Working with APIs
Objective
The objective of this task was to understand what an API (Application Programming Interface) is, how it works, and how it can be used to fetch and display data from an external service in an application.
What I Did
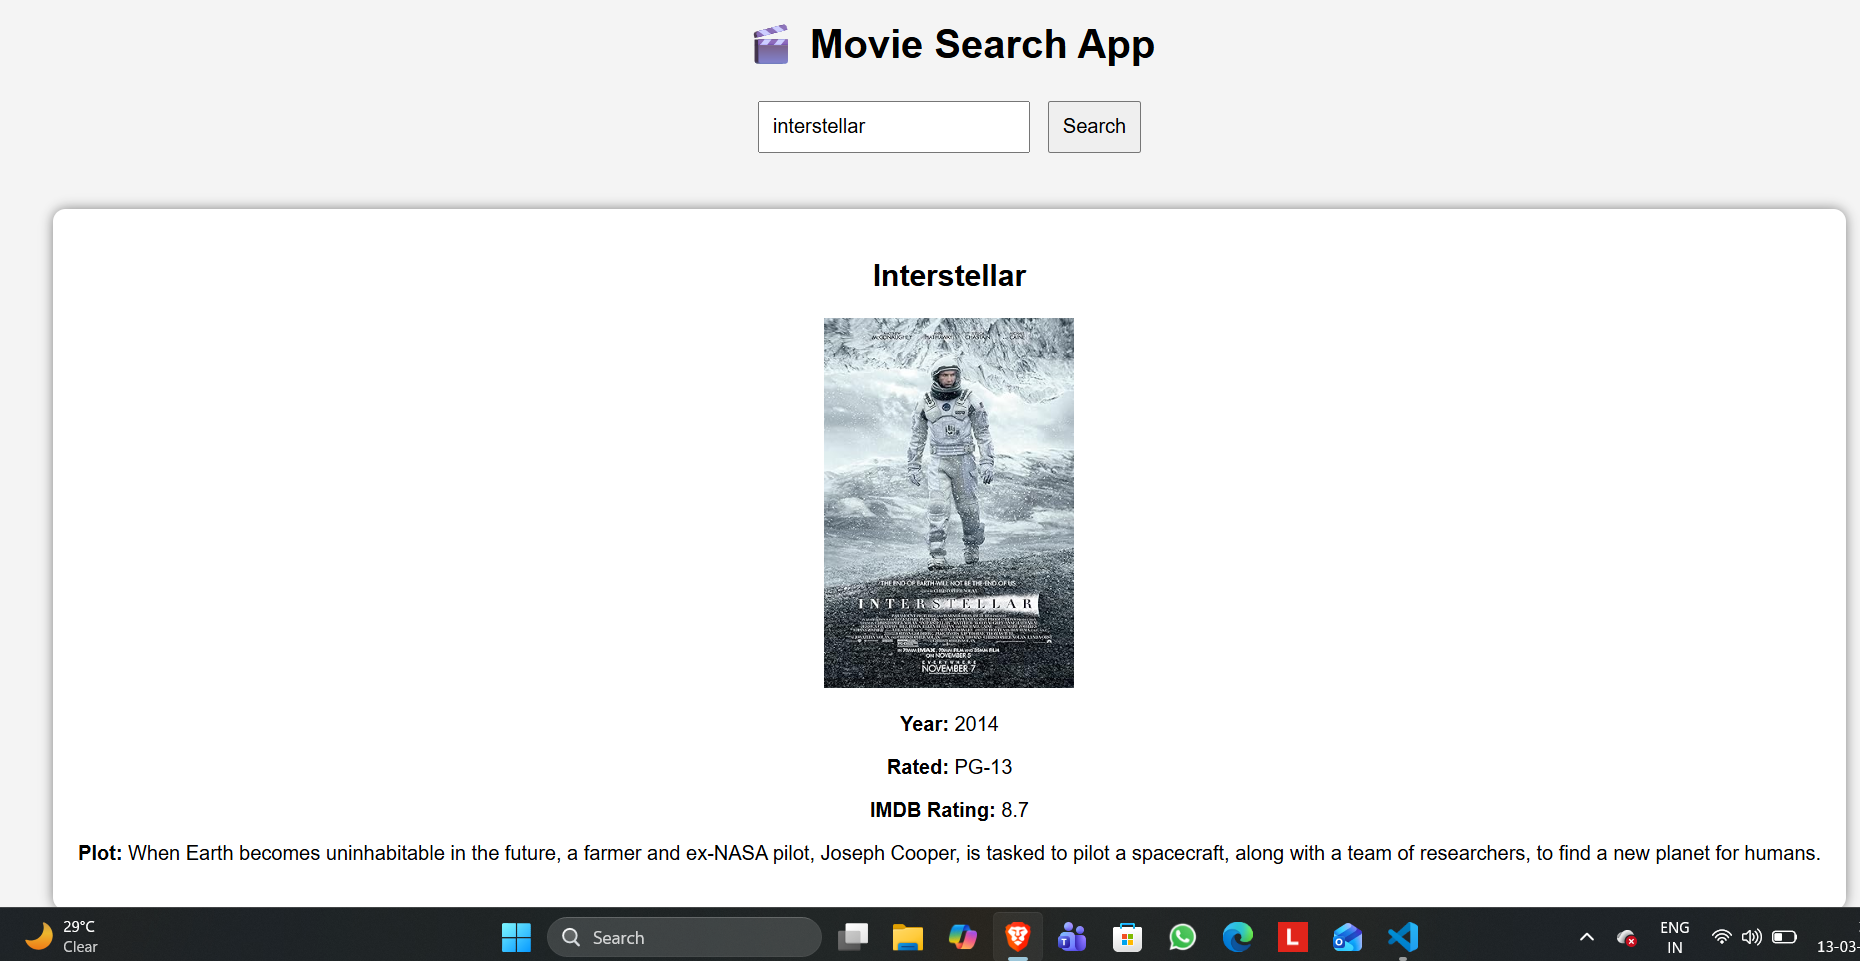
For this task, I built a simple movie rating web application using a movie database API. I used an API key to send requests to the API and retrieve movie information.
I created a user interface where a user can enter the name of a movie. The application then sends a request to the API and fetches the movie details such as the title, release year, poster, and IMDB rating. The data returned by the API is in JSON format, which I processed using JavaScript and displayed on the webpage.
Application Screenshot
Outcome
Through this task, I learned how APIs work and how applications communicate with external services. I also learned how to make API requests. This task helped me understand how APIs are used in real-world applications.
Task 3: Working with GitHub
Objective
The objective of this task was to learn how to work with GitHub workflows, identify issues in a repository, and contribute by fixing errors through a pull request.
What I Did
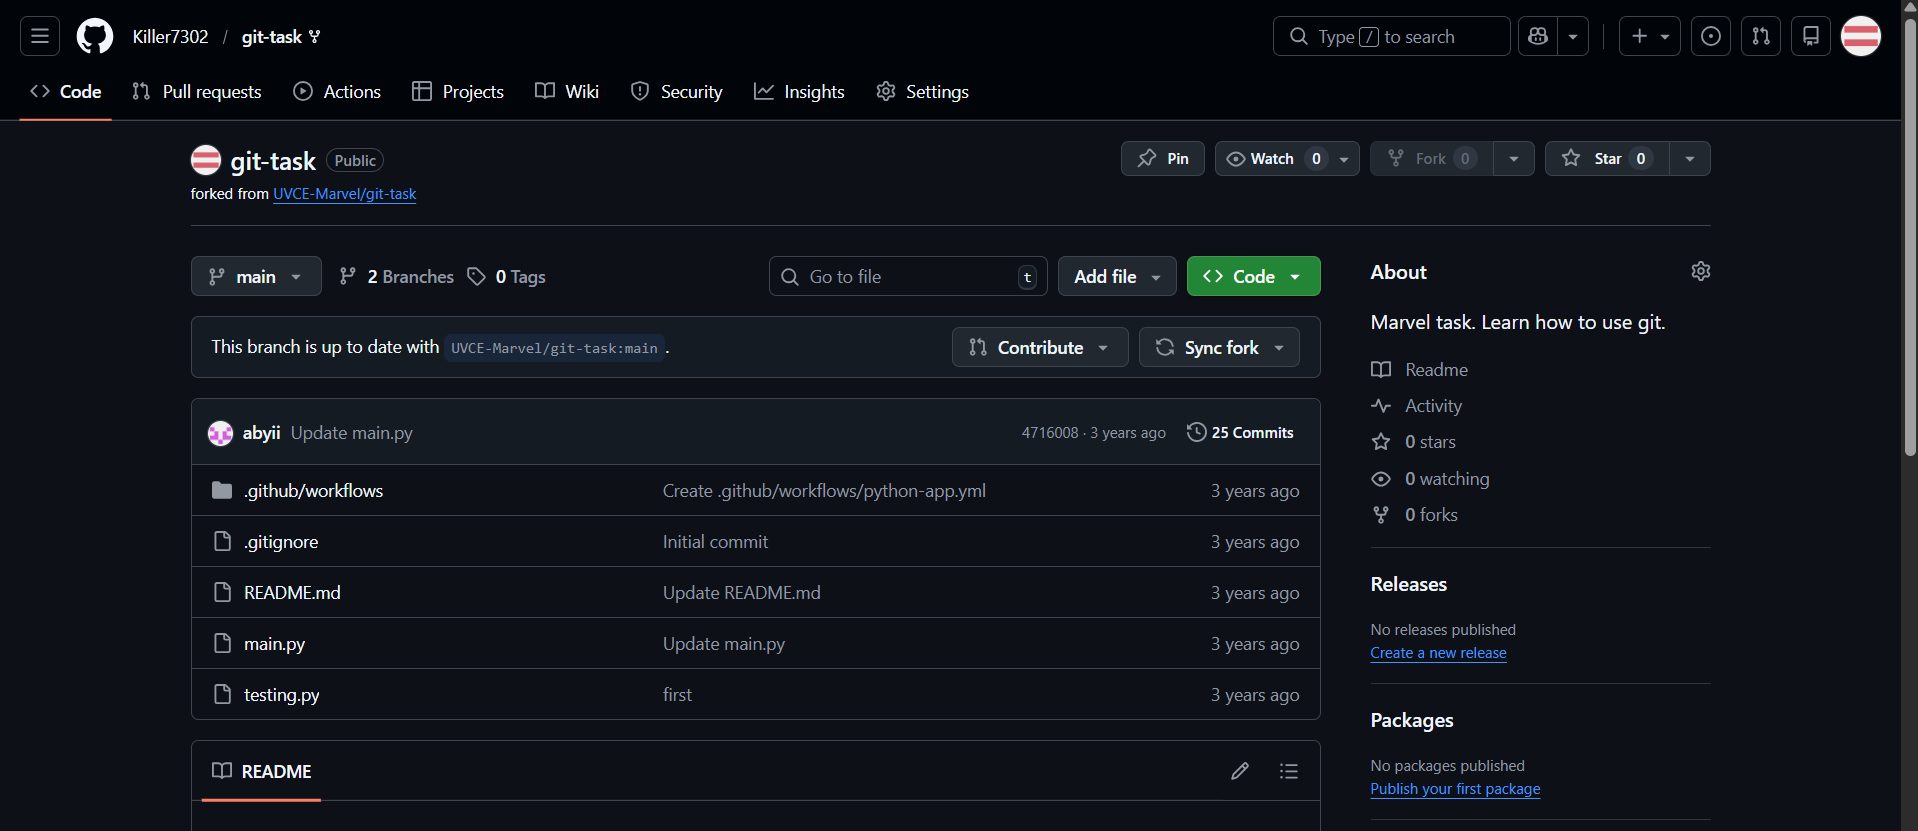
I explored the given GitHub repository and checked the instructions in the README. The main branch had an error that caused the tests to fail. After reviewing the code, I found that the function was returning an incorrect value:
return num_A + num_B + 1
I fixed the issue by modifying the line to: return num_A + num_B After correcting the code, I committed the change and opened a pull request proposing the fix. I also got familiar with Git bash which i used to clone the forked repo ,create a seperate branch and commit and push changes.
Screenshot
Outcomes
Through this task, I learned how to examine a repository, identify a bug, make code changes, commit them, and create a pull request. This helped me understand how developers collaborate and contribute to projects using GitHub.
Task 4: Working with Ubuntu Command Line
Objective
The objective of this task was to become familiar with the Ubuntu command line and learn basic terminal commands for file and folder management.
What I Did
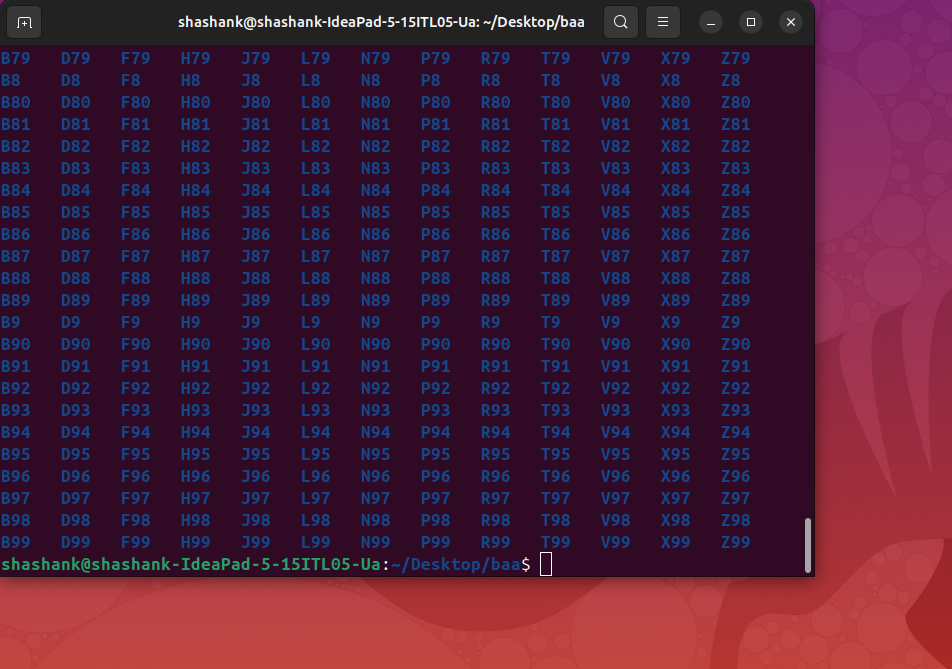
For this task, I used the Ubuntu terminal to perform several operations. First, I created a folder named test and navigated into it using the cd command. I then created a blank file without using a text editor and listed the files in the directory using the ls command.
Next, I generated 2600 folders inside the test directory with names such as M90, B56, and similar patterns. Finally, I created two text files with random text and used the cat command to concatenate their contents and display the combined output in the terminal.
Outcome
Through this task, I learned how to use basic Ubuntu command line tools for creating directories, managing files, listing directory contents, generating multiple folders, and combining text files. This helped me become more comfortable working with the Linux terminal environment.
Task 5: Build Your Own Brain – Linear Regression from Scratch
Objective
The objective of this task was to understand how linear regression works by implementing it from scratch and comparing its performance with the implementation provided by the scikit-learn library using the California Housing dataset.
What I Did
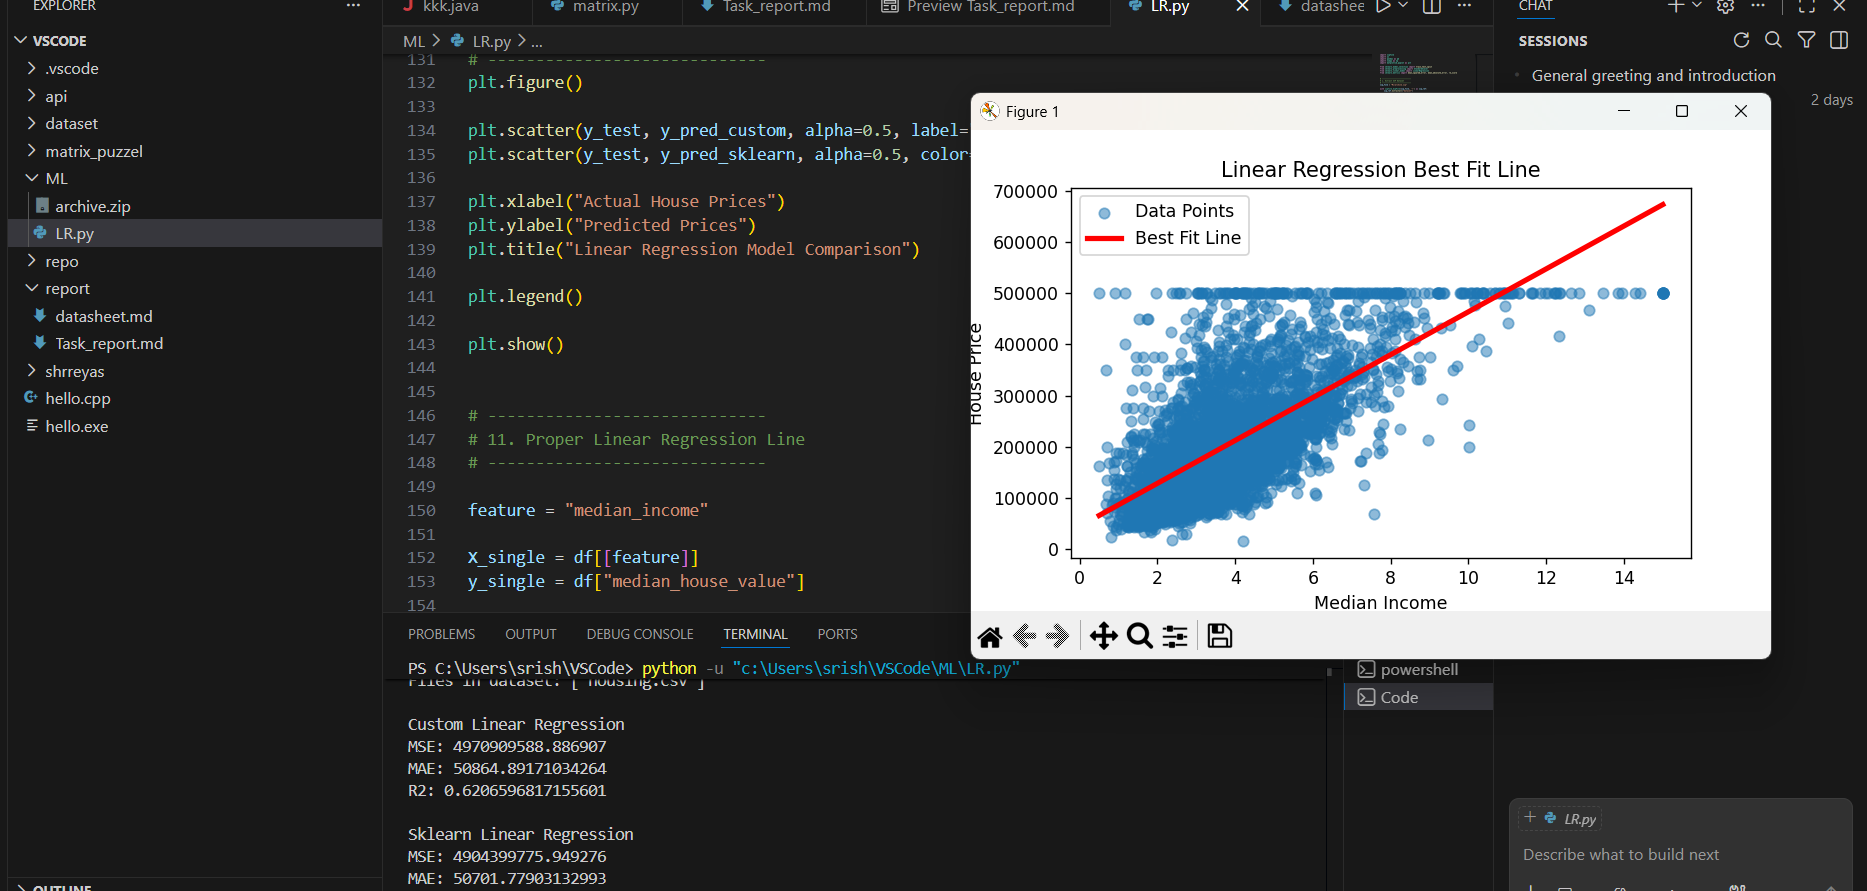
For this task, I implemented a linear regression model manually using Python without using machine learning libraries for training. I used gradient descent to update the model parameters and minimize the prediction error.
I trained my custom model using the California Housing dataset and generated predictions from it. I also trained a model using scikit-learn’s LinearRegression to compare the results.
To evaluate the performance of both models, I calculated the following metrics:
- Mean Squared Error (MSE)
- Mean Absolute Error (MAE)
- R² Score
I also plotted a graph showing the line of best fit along with the data points to visualize how well the model fits the data.
Best Fit Line
Outcome
Through this task, I gained a deeper understanding of how linear regression works internally, particularly how gradient descent is used to optimize model parameters. I also learned how to evaluate model performance using common metrics and compare a custom implementation with a library-based implementation.
Task 6: The Matrix Puzzle — Decode with NumPy & Reveal the Image
Objective
The objective of this task was to become familiar with NumPy operations and data manipulation techniques by decoding a scrambled matrix and revealing a hidden image using Python.
What I Did
For this task, I downloaded the scrambled matrix and used NumPy to manipulate and reshape the matrix. I applied different NumPy operations such as reshaping and reorienting the matrix to correctly organize the data.
After reconstructing the matrix, I used Matplotlib and the imshow() function to visualize the matrix as an image and reveal the hidden picture.
Output
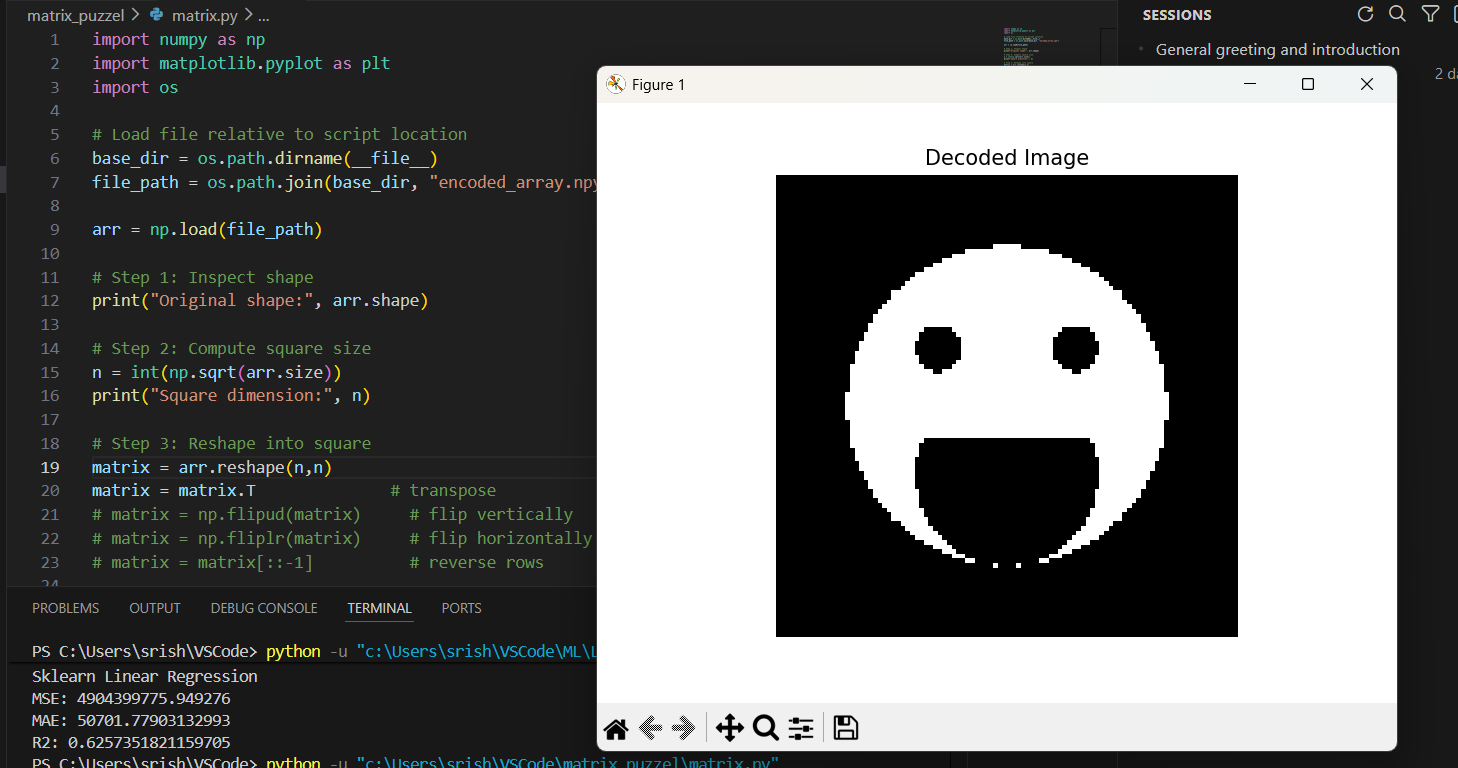
Outcome
Through this task, I learned how to work with NumPy arrays, perform matrix manipulations, and visualize data using Matplotlib. This helped me better understand how numerical data can be transformed and displayed as images.
Task 7: Create a Portfolio Webpage
Objective
The objective of this task was to create a personal portfolio website to showcase information about myself, my interests, projects, and social media profiles. The website also needed to be responsive and hosted on a Git repository.
What I Did
For this task, I designed and developed a portfolio website that includes sections such as About Me, Interests, Projects. I used HTML for structure, CSS for styling,js file for interactive feature and responsive design techniques to ensure the website works properly on different screen sizes.
After completing the website, I uploaded the project files to a GitHub repository so that the portfolio could be accessed and shared online.
Outcome
Through this task, I learned how to design and build a personal portfolio website, apply responsive web design techniques, and manage project files using GitHub. This task helped me improve my web development and project presentation skills.
Task 8: Writing Resource Article using Markdown
Task 9: Tinkercad – Ultrasonic Sensor and Radar System
Objective
The objective of this task was to get familiar with Tinkercad, understand basic electronic circuits, and simulate circuits using an ultrasonic sensor to measure distance. Another goal was to create a simple radar system using an ultrasonic sensor and a servo motor.
What I Did
First, I created a Tinkercad account and I then created a circuit using an ultrasonic sensor and servo motor to measure the distance between the sensor and an obstacle.Although the servo was meant to rotate the Ultrasonic sensor, i couldnt make it in the simulator and have run the motor and ultrasonic sensor seperately.

Outcome
Through this task, I gained an introduction to:
- Tinkercad and circuit simulation
- Working of an ultrasonic sensor
- Working of a servo motor
- Basic radar detection concepts
This task helped me understand how sensors and motors can work together to detect objects and measure distance in electronic systems.
Task 10: Speed Control of DC Motor
Objective
The objective of this task was to understand how to control the speed of a DC motor using an Arduino Uno and the L298N H-Bridge motor driver.
What I Did
For this task, I studied how the L298N motor driver works and how it can be used with an Arduino to control a DC motor. I first created the circuit in Tinkercad to simulate the setup and verify the connections.
I connected the 5V BO motor to the L298N motor driver and interfaced the driver with the Arduino Uno. Using Arduino code and PWM (Pulse Width Modulation), I controlled the speed of the motor. After testing the circuit in simulation, I implemented the same setup using actual hardware and recorded videos of the motor speed control.
Video
Outcome
Through this task, I learned how to control the speed of a DC motor using an Arduino and the L298N motor driver. I also understood the concept of PWM for speed control and gained experience working with both circuit simulation and real hardware implementation.
Task 11: LED Toggle Using ESP32
Objective
The objective of this task was to learn the basics of the ESP32 microcontroller and understand how to create a standalone web server that can control an LED connected to the ESP32.
What I Did
For this task, I first configured the Arduino IDE to support ESP32 boards by installing the required board packages. After setting up the environment, I connected an LED to one of the ESP32 GPIO pins.
I then wrote a program in the Arduino IDE to create a simple web server on the ESP32. When connected to the same network, the web server allowed me to turn the LED on and off through a web page. After writing the code, I uploaded it to the ESP32 and tested the LED control through a browser.
Outcome
Through this task, I learned how to configure the Arduino IDE for ESP32, create a basic web server using the ESP32, and control hardware components through a web interface. This helped me understand the basics of IoT device control using ESP32.
Task 12: Soldering Prerequisites
Objective
The objective of this task was to learn the basics of soldering, understand the soldering equipment used in the lab, and perform a simple soldering task on a perf board under the supervision of a coordinator.
What I Did
For this task, I learned about the different soldering tools and materials available in the lab, including the soldering iron, solder wire, flux, and soldering wick. I understood their purpose and how they are used during the soldering process.
Under the guidance of a coordinator, I practiced basic soldering on a perf board by assembling a simple LED circuit. I carefully heated the soldering iron, applied solder to the component leads and copper pads, and ensured proper connections between the components.
Outcome
Through this task, I learned the fundamentals of soldering, how to use soldering equipment safely, and how to create basic electronic connections on a perf board. This experience helped me gain practical skills in assembling simple electronic circuits.
Task 13: 555 Astable Multivibrator
Objective
The objective of this task was to understand the working of a 555 timer in astable mode and design a circuit that produces a 60% duty cycle output signal. The output waveform was then observed using a Digital Storage Oscilloscope (DSO).
What I Did
For this task, I designed a 555 astable multivibrator circuit by selecting appropriate resistor and capacitor values to achieve a 60% duty cycle. I then assembled the circuit on a breadboard using a 555 timer IC, resistors, and a capacitor.
After completing the circuit connections, I powered the circuit and used DSO probes to measure the output signal from the timer. Using the Digital Storage Oscilloscope, I observed the square wave output generated by the astable multivibrator and verified the duty cycle of the waveform.
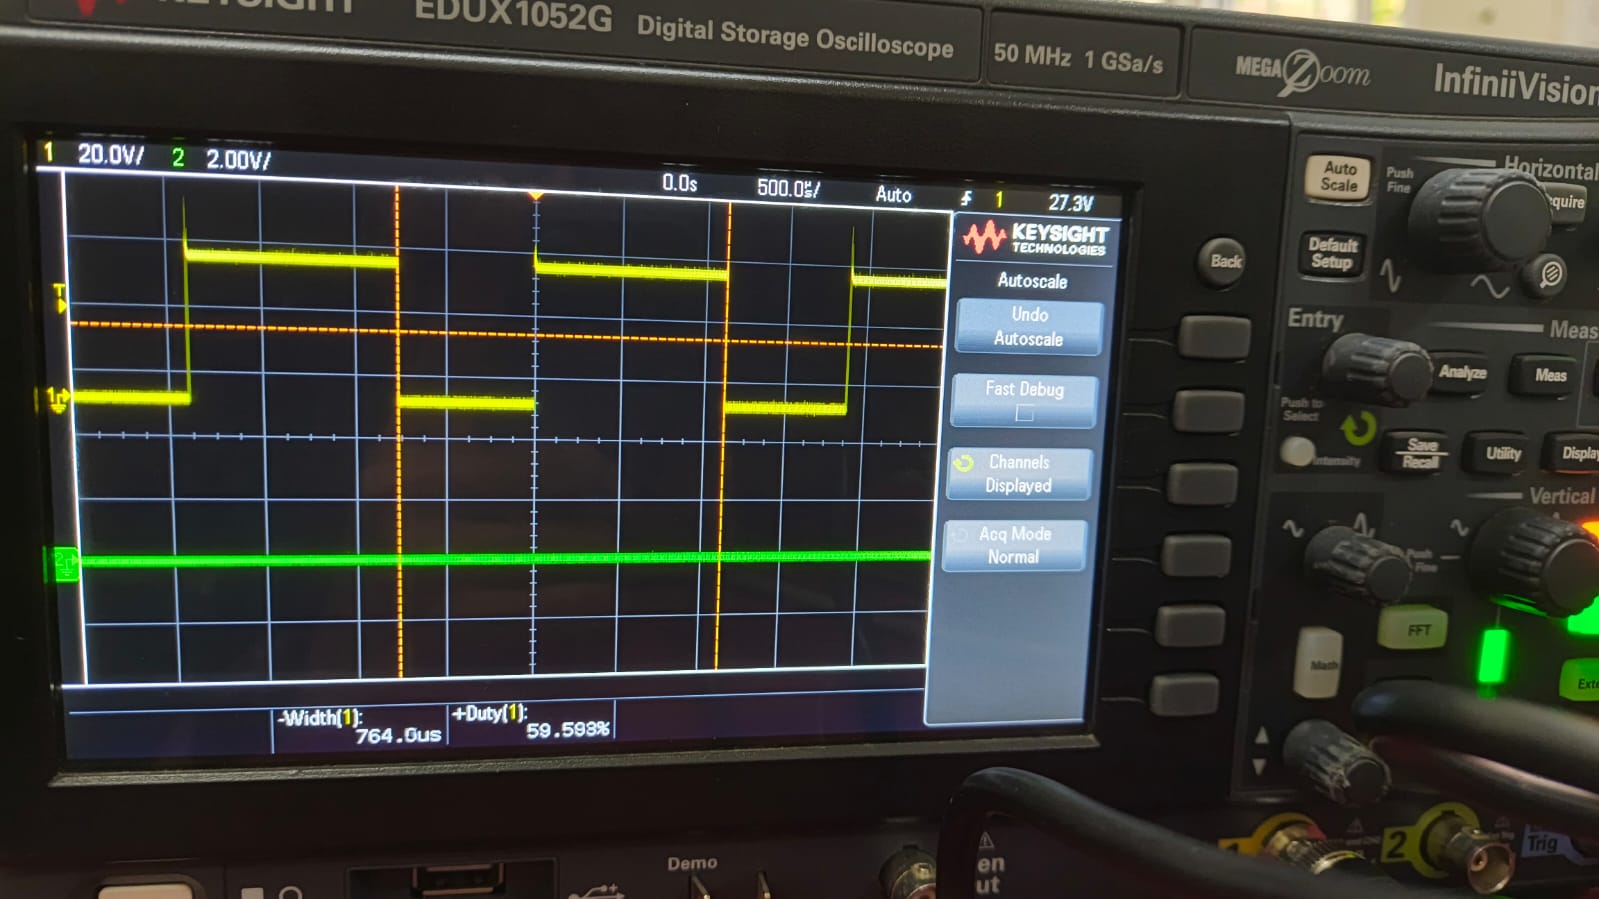
Outcome
Through this task, I learned how a 555 timer operates in astable mode, how duty cycle can be controlled by selecting resistor and capacitor values, and how to use a DSO to observe and analyze output waveforms from electronic circuits.
Task 16 - Writing Datasheet
See Datasheet and continued report here!