
COURSEWORK
Devika's EV-RE-001 course work. Lv 1
| Devika Kanekal mutt | AUTHOR | ACTIVE |
12 / 9 / 2025
TASK 1: API
An API is a set of rules and protocols that enables different software components to exchange data, functionality, or services. I built a weather web app using a weather API that displays the current temperature, weather conditions, humidity, wind speed, sunrise, and sunset times.

Outcomes:
TASK 2: Working with Github
I explored the GitHub environment by accessing the provided repository and following the README to understand key features: GitHub Actions, Issues, and Pull Requests. I forked the repository into my own account, cloned it locally, and made the specified changes to complete the Marvel task. I learned how to create and delete my own repositories and understood how to contribute to others' projects by submitting pull requests. This process involved creating a new branch, committing my changes, and pushing them to my forked repository. I then submitted a pull request to the original repository, proposing my changes for review.

 Link to github:https://github.com/UVCE-Marvel/git-task/pull/213
TASK 3: Get familiar with the command line on ubuntu and do the following subtasks:
I understood the ubuntu command lines and:
-
I created a folder named Marvel and navigated into it.
-
I created a blank file without using a text editor.
-
I listed the files to see what was in the folder.
-
I created 2600 folders with unique names.
-
I combined the content of two different text files and displayed them on the screen.

Task 4 : Build Your Own Brain -Linear Regression from Scratch
Implemented simple linear regression using batch gradient descent: iteratively updated slope and intercept to minimize MSE and plotted the resulting best-fit line against the data points.
Scikit-learn model (OLS closed-form): Used sklearn.linear_model.LinearRegression, which computes optimal coefficients via ordinary least squares by minimizing residual sum of squares analytically.
Visualization comparison: Plotted both the batch gradient-descent line and the scikit-learn regression line together on the same scatter
Performance metrics (MSE, MAE, R²): Calculated and contrasted MSE (average squared error), MAE (average absolute error), and R² (proportion of variance explained) for both models.

Task 5: The Matrix Puzzle — Decode with NumPy & Reveal the Image
I loaded a flattened NumPy array, used reshape() to reconstruct it into a square 2D image, then applied np.fliplr() to horizontally mirror that half and reconstruct the full face, and finally displayed the complete image with matplotlib.pyplot.imshow() in grayscale—leveraging NumPy’s efficient reshape and flip routines to uncover the hidden picture.

code: 
TASK 6: Create a Portfolio Webpage
I built a personal portfolio website to showcase my skills, projects, and social media profiles. Using HTML, CSS, and JavaScript, I designed a clean, user-friendly layout that adapts seamlessly across devices. I included sections like "About Me," "Projects," and "Contact," ensuring the site reflects my professional identity. To enhance functionality, I utilized a CSS framework and added interactive elements with JavaScript.


TASK 7: Tinkercad
I created a Tinkercad account and familiarized myself with the platform by exploring example circuits. I then simulated a simple circuit using an ultrasonic sensor to measure the distance to an obstacle, displaying the results on the serial monitor. Building upon this, I developed a radar system that utilized the ultrasonic sensor and a servo motor. The sensor emitted sound waves to detect objects, while the servo motor rotated the sensor to cover a wider area, effectively scanning for obstacles within a specified range.


Output:Click Here
TASK 8: Speed Control of DC Motor
The speed of the DC motor can be controlled by varying the input voltage to the motor and the most common method of doing that is by using PWM (Pulse Width Modulation) signal. For controlling the rotation direction, we just need to inverse the direction of the current flow through the motor, and the most common method of doing that is by using an H-Bridge. The L298N is a dual H-Bridge motor driver which allows speed and direction control of two DC motors at the same time. As a part of this task, I used L298N motor driver, Arduino UNO board, potentiometer to control the speed of the DC Motor.

 Outcome:
Click Here
Outcome:
Click Here
TASK 9: LED Toggle Using ESP32
I set up an ESP32 microcontroller, which has built-in Wi-Fi, and connected it to LEDs with resistors on a breadboard. Using the Arduino IDE, I uploaded a program that included my mobile hotspot details. Once the ESP32 was connected, it showed an IP address on the serial monitor. By entering this IP address into my phone’s browser, I was able to control the LEDs and toggle them on or off wirelessly.
 Outcome:click here
TASK 10: Soldering Prerequisites
I learned about the basic soldering tools available in our lab, including the soldering iron, solder wire, soldering wick, and flux. I understood their functions and safe handling methods. With guidance from the coordinator, I practiced basic soldering on a perf board by assembling a simple LED circuit. This activity helped me gain hands-on experience in connecting electronic components securely, ensuring proper joints, and using wick to correct mistakes. It gave me practical knowledge of soldering techniques.
.jpeg?raw=true)

TASK 11: 555 TIMER IC
The 555 Timer IC is a widely used component in electronics, known for its applications in timing, delay, pulse generation, and oscillation circuits. In this experiment, the IC was configured in astable mode to generate a continuous square wave. By selecting resistors in a 2:1 ratio along with suitable capacitors, a duty cycle of about 57.5% was achieved. The circuit was built and tested, and the corresponding waveform was observed on the oscilloscope, as shown below.

Task 12: Active Participation:
I participated in KAGADA Poster Presentation which a part of the prestigious Annual National-Level Technical Student Conference organized by IEEE UVCE (University Visvesvaraya College of Engineering).

Task 13: K-Map & Deriving Logic Gates
The circuit is designed using simple logic gates with two inputs Door (D) and Key (K). The LED (L) is used as the indicator. The LED glows (L = 1) only when the door is open (D = 1) and the key is not inserted (K = 0). In all other input conditions, the LED remains OFF (L = 0). A Karnaugh map is used to simplify the logic expression, and the final circuit is implemented so that the LED blinks under the defined condition.
 This the truth table
 Outcome:click Here
Task 14: Introduction to VR
What is Virtual Reality?
Virtual reality (VR) is a technology that creates a computer-generated simulation of a three-dimensional environment, allowing users to interact with this environment as if they were physically present. This immersive experience is typically achieved through the use of head-mounted displays (HMDs), motion tracking sensors, and sometimes haptic feedback devices that simulate touch and other sensations. How Does VR Work? VR systems work by using computer modeling and simulation to generate realistic environments. Users wear VR headsets that display stereoscopic images, creating a sense of depth. Motion sensors track the user's movements, adjusting the visuals in real-time to maintain the illusion of being in a different space. This technology can engage multiple senses, including sight, sound, and touch, enhancing the immersive experience.
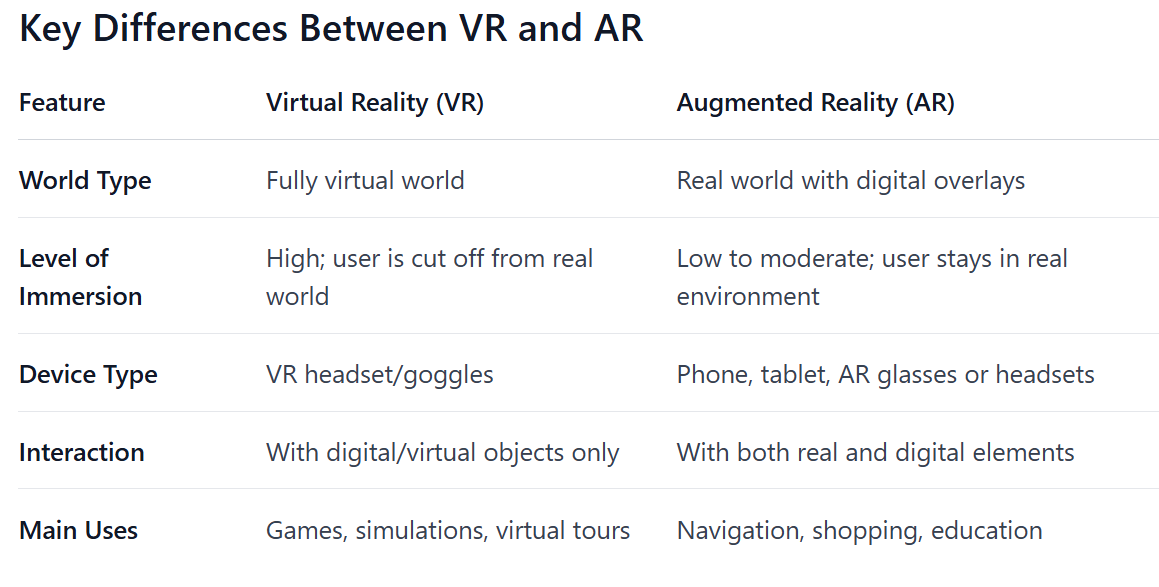
Difference between VR and AR
TRENDS IN SPACE AND TECHNOLOGY:
-
3D Printed Parts: Instead of building rocket parts piece by piece, engineers are now "printing" them using special 3D printers. This is faster, cheaper, and makes the parts lighter. This new method was already used on a rocket launch and is expected to become more common after more testing to make sure the parts are as strong as the old ones.
-
Reusable Rockets: Instead of throwing away rockets after each launch, companies like SpaceX are building them to land back on Earth so they can be used again. This is like a reusable airplane versus a one-time-use rocket. Making rockets reusable dramatically lowers the cost of space travel, but it requires a lot of testing to make sure they are safe after multiple trips.
-
Safer Rocket Fuel: Traditional rocket fuels are often dangerous for people handling them and bad for the environment if there's a problem. New types of "green" fuels are being developed that are safer and cleaner. There are also new electric-powered systems that are more efficient.
-
Artificial Intelligence (AI): AI is being used as a smart assistant in space. Since space is so vast, AI can help satellites avoid crashing into each other, quickly analyze huge amounts of data from space, and even control rovers on other planets when it takes too long for commands to get there from Earth.
-
Tiny Technology (Nanotechnology): To save money, engineers are making satellites and their parts much, much smaller. Think of tiny microchips and sensors. This is important because the heavier a rocket's payload, the more it costs to launch.
Top 5 Space Companies in India Listed in Stock Market
-
Apollo Micro Systems Ltd- Specialises in high-precision electronic systems for aerospace and defence that support satellite and launch vehicle technology.
-
Azad Engineering Ltd- Manufactures complex components for turbines and engines for the Aerospace, energy and defence sectors in partnership with global giants like GE and Mitsubishi Heavy Industries.
-
Bharat Electronics Ltd. (BEL)- An aerospace leader and defence that offers advanced electronic systems and radars for India’s satellite and space programs.
I got an opportunity to experience Virtual Reality in Marvel.

Task 15 Writing Resource Article using Markdown
I wrote a technical resource article on the emerging semiconductor industry. The article focused on its growing significance in modern technology, key components, and recent advancements driving innovation. I also highlighted the major challenges the industry faces, such as supply chain issues and high manufacturing costs.


